How to Activate WiFi on Your Dell Laptop: A Comprehensive Guide
How to Activate WiFi on Your Dell Laptop: A Comprehensive Guide
Contents
show
Setting up a wireless internet connection on your Dell laptop can seem like a daunting task, especially for individuals not familiar with the intricacies of modern technology. However, you don’t need to be a technology expert to get your Dell laptop connected to your WiFi network. This guide explores the process to help you do it yourself without calling for technical support.
If you are wondering how can I get WiFi enabled on my Dell laptop? then this article is going to be exceptionally useful for you. This comprehensive guide is going to take you through the process step-by-step, making it easy for even a novice to connect to the internet wirelessly. From locating your network, entering the correct password, to troubleshooting common issues, this guide covers everything you need to know to use WiFi on your Dell laptop.
This tutorial provides detailed instructions with accompanying screen images to ensure that anyone, irrespective of their technical proficiency level, can follow along. This guide takes the guesswork out of the entire WiFi enablement process, ensuring you have an uninterrupted wireless internet connection set up on your Dell laptop. Stay connected without the hassle of wires and get the most out of your online experience!
Checking Whether Your Dell Laptop is Equipped with WiFi
It’s essential to confirm whether your Dell laptop is embedded with WiFi functionality to successfully leverage wireless network connectivity. Most modern laptop models come standard with this functionality, but here is how you can verify it on your Dell machine.
Inspecting the Laptop for WiFi Indicators
A physical examination of your laptop can provide clues about WiFi capability. Ordinarily, if your Dell computer supports WiFi, it should have a wireless symbol printed somewhere around the keyboard area or on the side of the machine. This generally appears as an antenna or bars.
Examining Your Laptop’s System Information
You can also verify WiFi capability by checking the system information of your Dell laptop. Below is a step-by-step guide.
- Click on the Start Menu in the bottom left of your screen.
- Search for the System Information application and click to open it.
- Under the Hardware category, check for a subcategory named Components.
- Under the Components list, select Network.
- After choosing Network, look for Adapter. If your laptop supports WiFi, you should find an entry that says something similar to Wireless or 802.11.
Using the above strategies, you should be able to confirm if your Dell laptop includes WiFi capability. After establishing this, you’re ready to proceed with establishing your wireless network connection.
Grasping the Significance of Turning on WiFi on a Dell Laptop
When it comes to maximizing the connectivity and functionality of your Dell laptop, the significance of turning on WiFi cannot be overstated. This feature allows your device to connect to the internet, providing access to a vast range of online resources, applications and services that enhance your user experience and productivity.
Being able to turn on your laptop’s WiFi is especially crucial in this digital age where internet access is almost paramount. As a laptop user, you deal with a variety of tasks such as emailing, browsing, file sharing, streaming, or even online gaming. Each of these activities requires a stable internet connection, which you can only achieve by activating your Dell laptop’s WiFi.
Moreover, activating WiFi also allows you to utilize wireless connectivity technologies such as Bluetooth, which can facilitate the transfer of files between devices, connection to audio equipment, among other functions.
The Benefits of Activating WiFi
- Seamless Internet Access: WiFi activation lets you harness wireless internet networks available in your vicinity, providing you with uninterrupted access to the internet.
- Cost Efficiency: WiFi networks, especially those at home or in public places, often come at little to no cost, making it a more economical choice compared to mobile data.
- Mobility: Unlike a desktop that requires an Ethernet cable for internet connection, a Dell laptop with an activated WiFi gives you the freedom to move around and still stay connected.
- Multimedia Experience: From video conferencing to streaming music and movies, the activation of WiFi enhances your multimedia experience by providing the necessary bandwidth for these services.
In conclusion, the ability to activate WiFi on your Dell laptop greatly amplifies your device’s capabilities, making it a vital feature for any user. By understanding its importance, you can better appreciate and make optimum use of this technological marvel.
Understanding the WiFi Connection Status on Your Dell Laptop
Identifying the status of your wireless internet connection on a Dell computer is vital for troubleshooting connectivity issues or simply ensuring you’re connected. Here are a few steps you can follow.
Using the Network and Sharing Centre
The Network and Sharing Center in the Control Panel is a useful tool to quickly check your WiFi connection status. Look for the highlighted ‘Connections’ to track your WiFi status. Click on it to see more details such as speed, signal quality and the duration of connectivity.
Using the WiFi symbol in system tray
At the bottom right of your screen, in the system tray, you can locate the WiFi symbol. This icon shows the strength of your connection, and it will have a star if you’re connected to a network. When you hover the cursor over this symbol, it will display your current connection speed. A red cross over the icon indicates no active connection.
If you’re faced with connection problems, the troubleshooting guide accessible by right-clicking the WiFi symbol may help resolve some common issues.
Using Command Prompt
For those seeking a more technical approach, the Command Prompt tool can also provide detailed information about your WiFi status. Open Command Prompt, type ‘netsh wlan show interfaces’ and press enter. This command will reveal your WiFi connection’s current status, signal quality, and more.
Staying aware of your Dell laptop’s WiFi connection status can ensure that you maintain a stable, high speed internet connection critical for many tasks. By using these steps, you can quickly resolve most of the common WiFi issues faced by Dell laptop users.
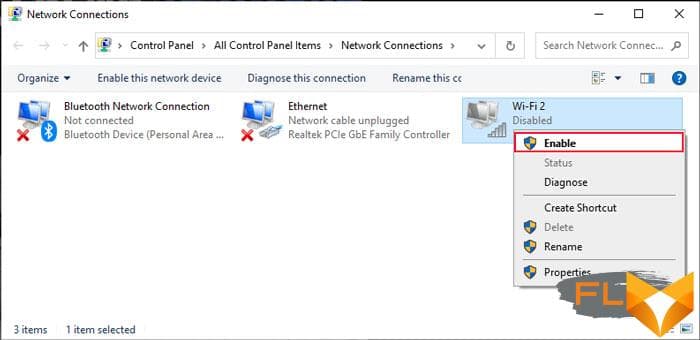
Locating the WiFi Control on Your Dell Notebook
Enabling the WiFi on your Dell notebook can be a straightforward process, but first, you need to locate the WiFi switch. Due to varying laptop models, the WiFi control might be placed in different locations.
Hardware Switch
Some Dell models come with a physical switch that controls WiFi connectivity. This hardware switch is usually found on the sides or front of the notebook and is marked with a wireless icon. By sliding this switch, you can turn the WiFi on or off. However, not all models will have this physical switch.
Function Key
Another common method to control the WiFi on Dell notebooks is through a function key. On the keyboard, one of the top row function keys (F1-F12) might have a wireless icon. By pressing this key along with the Fn key, generally found at the bottom of the keyboard, you can activate or deactivate the WiFi.
On-Screen Settings
For Dell notebooks that don’t offer a physical switch or a function key, you can control WiFi connectivity through on-screen settings. These settings can be found within the operating system’s network or connectivity menus. Here, you will find the option to turn WiFi on or off.
To conclude, Dell notebooks offer various methods to control WiFi connectivity, depending on the model. Knowing how to locate the WiFi control is the first step you should take before attempting to connect to a network. Remember, if you can’t locate the WiFi switch or have difficulties activating it, don’t hesitate to reach out to Dell’s customer support for assistance.
Facilitating WiFi functionality with Dell’s Quickset Network Card
Promoting wireless connectivity on your Dell laptop can be achieved effortlessly through the Quickset Network Card. This tool is essential for users who value mobility and convenience, as it provides a simple and intuitive approach for leveraging WiFi capabilities. Here is a systematic guide to manage WiFi access using this feature.
Starting the process
Firstly, make sure your device is powered on and ready to go. Invigorate the Quickset utility by clicking the pertinent icon, usually found in the taskbar near the clock. If it’s not readily visible, look for it in the system tray. A right-click on this icon reveals a context menu. Select the option that refers to the Network Card or something similar.
Configuring the settings
In the ensuing Network Card settings dialog box, search for WiFi-related options. This is typically symbolized by an antenna-like icon. When spotted, make sure it is enabled or turned on, signifying that your laptop is ready to receive WiFi signals.
Final steps
Having enabled WiFi within the Quickset Network Card, now is the time to connect to a network. Click on the WiFi icon again, but this time in the system tray, and select your preferred WiFi network. Input the supervening network password, if asked, to complete the process. And voila, your Dell laptop is now connected to the desired WiFi network.
Note: Discrepancies might occur depending on the model of your Dell laptop and the version of the Quickset utility used. Always refer to the specific user guide/manual of your device for exact steps.
Facilitating WiFi on a Dell laptop through the Quickset Network Card is straightforward. This user-friendly feature does not simply enable WiFi but makes connecting to different networks effortless.
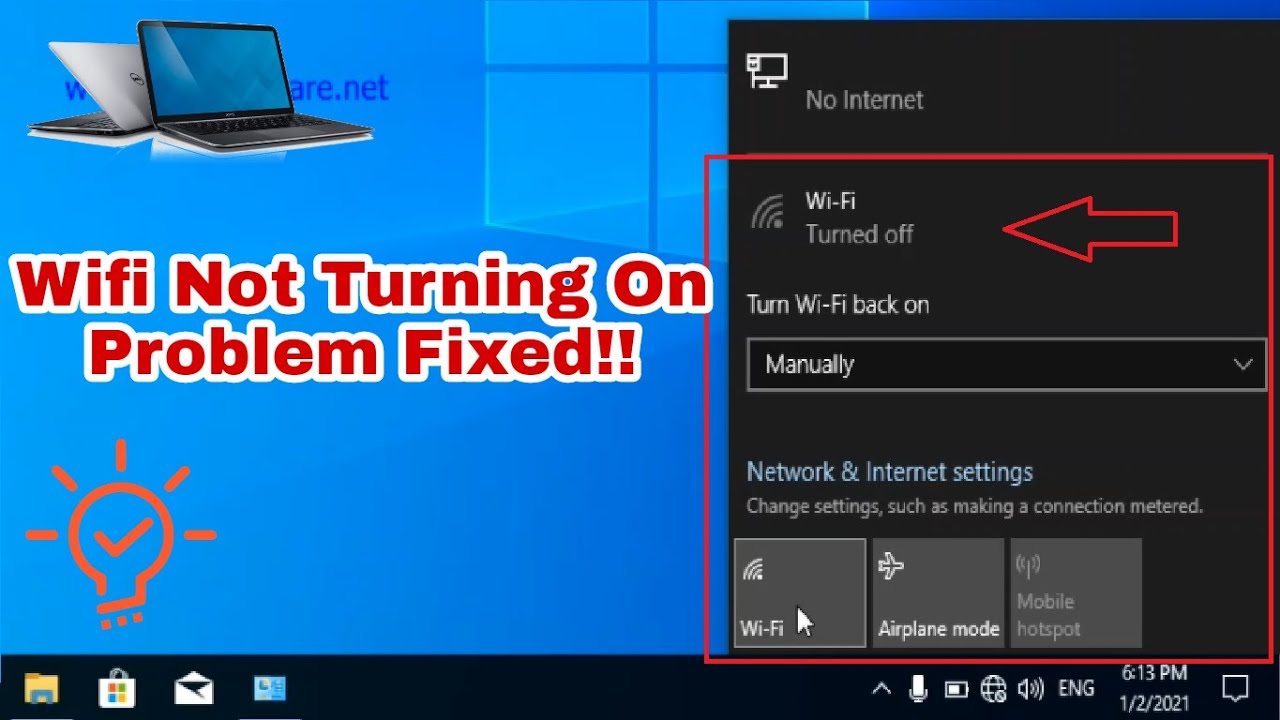
Engaging Wireless Connectivity on Your Dell Device Utilizing Windows
Utilizing the capabilities present in the Windows operating system allows users to establish an operational WiFi connection on their Dell laptops. This is an elementary process that involves a series of precise steps. It’s convenient, especially if your Dell device doesn’t come with a physical button to enable WiFi connectivity.
Establishing a Wireless Internet connection
The procedure commences by accessing the Windows quick settings. This is accomplished by clicking on the notifications icon that resides in the taskbar on the lower right side of the desktop interface. The subsequent step involves clicking on the ‘Network’ or ‘WiFi’ tile on the windows quick setting pane, depending on the version of the Windows operating system you are using.
Note: A No WiFi networks found message is exhibited in the absence of available networks. However, if a network is present, an extended list appears.
- Explore the available networks and pinpoint the one that meets your requirements.
- Select the preferred network and click ‘connect.’ To safeguard your laptop against unauthorized access, secured networks request password authentication. Ensure you key in the correct password.
- In the case of public networks, a ‘Connect automatically’ feature might appear. You can opt to tick or untick this feature based on your preference.
- Finally, click ‘Next’ to complete the connection process.
The Windows operating system on your Dell laptop doesn’t just facilitate the establishment of a new connection; rather, it allows users to review the connection status and strength of the WiFi network as well.
Fascinatingly, users also have the ability to disconnect from a WiFi network effortlessly. Follow the same sequence as when connecting to the network, only this time, click on ‘Disconnect’ after selecting the connected WiFi network.
Keeping Your Dell Notebook’s WiFi Drivers Current
So, youre having trouble with your Dell laptop’s WiFi connection, and you’re thinking it might be due to outdated WiFi drivers? Worry not, we have got you covered. This process might sound a bit complicated if you lack technical know-how about your laptop’s operating system and hardware, but trust us, it’s more straightforward than it seems.
Step-by-step guide on refreshing your Dell laptop’s WiFi drivers
Before we jump into the steps, it’s necessary to remind you that updating drivers on your laptop is a sensitive operation. Minor errors can interfere with your system’s stability. Now that we’ve addressed this essential point, let’s dive into the procedure:
- Establish an alternative internet connection: Since you’ll be dealing with WiFi drivers, you need another internet connection pathway like a LAN connector, mobile data, or a borrowed WiFi source.
- Visit Dell’s official website: Browse through to the ‘Support’ section. You’d find a page dedicated to downloading drivers.
- Find your laptop model: Enter your Dell Service Tag or Express Service Code to find your machine. This info is usually on the bottom of the laptop.
- Go through the relevant WiFi drivers: Look for the Network section, where you will discover WiFi drivers compatible with your laptop model.
- Perform the update: Click ‘Download’ and install the selected driver. Ensure your alternative internet source remains stable through the process.
Remember: After completing the update, it is advisable to restart your Dell laptop. This forces your system to recognize new drivers and optimizes their functionality.
You might find the updated version of WiFi drivers boosts your internet connection stability and eliminates previously experienced glitches. If, however, the problem persists, consider reaching out to Dell’s customer support or a trained technician.
Solving Frequent Problems Related to WiFi Connection Activation on Your Dell Laptop
1. Issues with Connecting to a Wireless Network:
Several reasons can cause problems when trying to connect your Dell laptop to a wireless network. These could range from simple hardware switches to software-related complications. First, always verify that your laptop has not been set to airplane mode, as this will disable all wireless communication. If you still encounter difficulties, checking your device drivers might be helpful. Outdated or corrupt drivers can lead to connection issues, and updating them could solve the problem.
2. Wireless Adapter Not Found
Another common problem is when the computer fails to recognize the wireless adapter. If that’s the case, restarting your laptop often resolves the problem. However, if it persists, opening device manager and enabling the wireless adapter manually can be the solution. Keep in mind that this problem could also be a sign of a malfunctioning adapter and may require a hardware replacement.
3. Slow WiFi Speeds
Slow WiFi speeds could be caused by various factors. These could include interference from other devices, or perhaps your laptop is too far from the router. Try putting your laptop closer to the router to see if speeds improve. If it doesn’t work out, you can troubleshoot your WiFi settings by going to network and sharing center and resetting the WiFi configuration. However, there is also a chance that the issue is from the service provider side. In that case, contacting the ISP would be the best course of action.
4. Frequent WiFi Disconnections
Another nuisance can be ongoing WiFi disconnections. These might occur due to low signal strength or certain power management settings that are turning off the WiFi adapter. To stop your laptop from disconnecting, you should look up your power management settings and disable the option allowing the laptop to turn off the WiFi adapter to save power. Improving the strength of your WiFi signal can also resolve the disconnection issues.
When It’s Time to Consult with a Technician for Assistance with your Dell Laptop’s WiFi Connection
If you’re having troubles activating the wireless internet connection on your Dell laptop, it may be time to get in touch with a professional technician. Even though there’s a comprehensive guide to help you with this task, sometimes the solutions provided might not solve the problem, or the whole process may seem a tad too complicated. That’s where the aid of an expert comes into play.
The biggest benefit of consulting a professional is their extensive understanding of the various components of the laptop and their possible issues. They can recognize and diagnose problems swiftly, often presenting easy-to-follow steps for resolution.
Moreover, professionals are aware of updates and changes to different laptop models and their WiFi capabilities. This knowledge becomes vital if your problem arises from an outdated software or a feature specific to your particular laptop model.
The following are few scenarios when the help of a professional might be necessary:
- When Windows Network Diagnostics can’t identify the issue.
- If the problem persists even after updating the WiFi driver.
- When laptop’s WiFi keeps disconnecting frequently.
- If you’re unable to locate the WiFi switch on your Dell laptop.
Besides this, they can also provide useful tips to prevent similar issues in the future. So don’t hesitate to get professional help with your Dell laptop’s WiFi activation when you feel stuck. It can save you a lot of time and possible hardships, ensuring a smooth and uninterrupted internet connection.
Keeping Your Dell Laptop’s Wireless Network Connection in Optimal Condition
If your Dell laptop consistently has a strong Wi-Fi connection, your online activities will be much smoother and faster. Hence, steps must be taken to ensure that your computer maintains an efficient wireless connection.
Key Actions for Effective Wi-Fi Connectivity
Update your Wireless Drivers Regularly: Manufacturers improve and fix their drivers over time. If you stay up-to-date with these changes, your Wi-Fi connection will likely be more stable and efficient. How do you do this? Visit the official Dell website, look for your specific laptop model, and download the wireless driver updates available.
Position your Dell Laptop properly: If your Dell laptop is too far from the Wi-Fi router, the signal can get weak. So, try to keep the device in closer proximity to the router. Also, objects like walls and floors can obstruct connection signals. Therefore, a clear line of sight between your laptop and the router is advisable.
Regularly Turn off Wi-Fi When Not in Use: Your laptop’s Wi-Fi doesn’t have to be on constantly. When you’re not using the Wi-Fi connectivity, switch it off. This will not only save your laptop’s battery but can also elongate the life of your wireless card.
- Regular Network Checks: Conducting periodic network checks is another useful step. If you notice your Wi-Fi connection getting slower, use a network analyzer tool to identify potential issues and fix them.
- Disconnect Unnecessary Devices: If many devices are connected to the same Wi-Fi network, it can slow down the speed. Consider disconnecting devices that are not in use.
In conclusion, maintaining an excellent Wi-Fi connection on your Dell laptop is not rocket science. With the right steps and attention to detail, you can enjoy smooth and efficient internet connectivity.
FAQ How to turn on wifi on dell laptop:
What are the steps to maintain a good WiFi connection on my Dell laptop?
You can ensure your WiFi maintains a strong connection through steps such as keeping your drivers up to date, maintaining a clear signal path, monitoring interference from other devices, changing WiFi channels if they’re crowded, setting a high preference for your WiFi network, and regularly restarting your router and laptop.
How do I update the wireless drivers on my Dell laptop?
You can update your drivers by visiting the Dell Support website, entering your laptop model, selecting the ‘Drivers & Downloads’ tab, choosing the WiFi driver, and downloading the latest version. You should then install the downloaded driver.
How can I reduce WiFi signal interference on my Dell laptop?
Avoid placing physical objects or electronic devices that can interfere with the WiFi signal near your laptop, or between your laptop and the router. This includes microwaves, cordless phones, mirrors, and certain types of lights. You could also try changing your WiFi channel to one that’s less crowded.
How do I set a high preference for my WiFi network on my Dell laptop?
Go to your ‘Network Connections’ settings, find your WiFi network, and select ‘Properties’. Under the ‘Connection’ tab, click ‘Configure’, then ‘Advanced’. From here, you can adjust settings such as ‘Roaming Aggressiveness’ and ‘Transmit Power’ to improve your WiFi preference and performance.
How often should I restart my router and laptop to maintain a good WiFi connection?
Regularly restarting your device and router can help maintain a strong WiFi connection. The frequency can depend on your usage, but a general rule of thumb is once a week. Restarting clears any unnecessary cache and resets your network hardware.
What should I do if my Dell laptop’s WiFi connection is still unstable after trying these steps?
If you’re still experiencing issues, it may be due to a hardware problem with your laptop or router, issues with your internet service provider, or outdated firmware on your router. Contact Dell Support or your service provider for further assistance.
Most Popular Articles

Best Graphics Card for Streaming and Seamless Gaming Experience Best Gpu For Streaming

Understanding and Resolving the Problem of Your Laptop Sounding Like a Jet Engine

HP ENVY 15 review: A nearly perfect all-round laptop
Best Pc Case For Cable Management Best Pc Cases For Airflow Pc Cases in 2024

ASUS ZenBook Flip S UX371EA ultrabook review: premium transformer

A Comprehensive Review of Dell Precision 3561: Features, Specifications and Performance