
Step-by-Step Guide: How to Screen Record on a Dell Laptop Efficiently
Step-by-Step Guide: How to Screen Record on a Dell Laptop Efficiently
Contents
show
In the digital age, the ability to record what’s happening on your computer screen has become a critical skill. Whether you’re a teacher creating instructional material, a gamer streaming your gameplay, or a professional conducting a webinar, screen recording has become a necessity. One may think that accomplishing this task requires high-end, advanced technical knowledge, but in a matter of fact, it is quite straightforward, especially on Dell laptops. This article aims to equip you with step-by-step instructions for successful and efficient screen recording on your Dell notebook.
Dell laptops, known for their state-of-the-art features, actually already come with built-in tools for screen recording, allowing even novice users to navigate this function with ease. However, for those who need or prefer using additional recording and editing features, numerous third-party software options are available that provide a wider range of flexibility and control over your recordings. This guide will cover both, enabling you to choose the method that suits your needs best.
So, if you’re looking for the most efficient ways to capture your screen activity on your Dell laptop, you’ve come to the right place. We’ve compiled a comprehensive manual to help you hurdle any difficulties you might be currently facing with screen capturing. Rest assured, after reading this, you’ll be a pro at screen recording with only a few clicks. Don’t let inexperience deter you, let’s get to it!
Grasping the Fundamentals of Capturing Footage from Your Screen
Knowing the basics of recording content displayed on your screen is an essential skill in today’s digital world. Whether you want to create tutorial videos, capture gameplay, show software demonstrations, or save webinars for later, having the capability to record your screen can be very handy. Let’s explore what screen recording is and how it generally works.
What is Screen Recording?
Screen recording, also known as a screencast, is a digital recording of computer screen output. It’s a dynamic way of showing what’s happening on your computer screen, usually accompanied by audio narration or overlaid graphics to enhance the explanation. Unlike screenshots, which are static images, screen recordings depict the motion and transition between different tasks and windows.
The practice of screen capturing primarily involves three key steps – setting up your screen, recording the screen, and saving or sharing the recorded video.
Setting up the Screen: Before you begin your recording, it’s crucial to prepare your screen. Close unnecessary tabs, clear off your desktop, and make sure what you want to record is the only thing in view. This preparation aids in producing a clean and focused recording.
Recording the Screen: The recording part depends on the screen recording tool or software you use. Many contemporary operating systems come with built-in screen recording tools, while others may require third-party applications. Remember to check system audio and microphone settings before beginning a recording session.
Saving or Sharing the Recorded Video: Once the recording is done, it can be saved as a video file, typically in MP4 format, which is widely compatible with most devices and platforms. You can then edit these recordings if necessary and share them via various channels, such as email, social media, or video hosting sites.
- When choosing a screen recording tool, consider features like recording area selection, audio capture capabilities, file format options, and ease of use.
- While recording, try to minimize interruptions and background noise for a smoother recording experience.
- Finally, be conscious of privacy. Make sure not to record sensitive information inadvertently.
Benefits of Recording Screen on Your Dell Laptop
Utilizing the screen recording feature on your Dell computer can greatly enhance efficiency and productivity in various tasks. Essentially, it takes your laptop’s capabilities to another level by offering the ability to capture and share happenings on your screen.
While screen recording features are ideal for creating tutorials and demonstrations, they can also be essential for those who work remotely. With screen recording, you are equipped with a reliable tool that makes sharing work progress, illustrating technical processes, or even demonstrating software or product features a hassle-free experience.
Beneficial for Educators and Corporate Trainers
The education sector benefits immensely from the screen recording feature on Dell laptops. Teachers, tutors, and trainers find this tool crucial for creating instructional videos, providing step-by-step guidance to students or trainees, and even for student assessments. It’s an effective visual tool that takes presentation and explanation of information to another level.
Remote Collaboration Made Simple
In our increasingly virtual world, remote work and collaboration have become the norm rather than the exception. In this case, screen recording serves as a collaborative bridge, as it permits team members to share ideas, provide illustrative feedback, and even resolve technical issues. Its a game changer for effective remote collaboration.
Documentation and Archival
Recording the screen of your Dell laptop also presents an efficient way of documenting important online meetings, webinars, or even live chats. Such recordings can be archived and referenced in the future when needed.
- Screen recording makes remote learning and teaching efficient.
- It simplifies remote work by improving collaboration among team members.
- Recording the screen helps in creating a digital archive of important online activities.
Getting Your Dell Laptop Ready for Effective Screen Recording
Before you initiate the process of capturing your screen actions on your Dell laptop, it’s crucial to prepare your device for the task. Proper initialization is a key step to achieving an efficient screen record. The following are some vital steps you need to consider:
Check Your Device’s System Performance
In order to get an optimal screen recording, your Dell laptop needs to be performing at its best. This means ensuring your device has enough storage space and that there are no unnecessary programs running in the background that may affect the performance of your computer and eventually, your recording. Shut down all nonessential applications to free up system resources, and if you plan on recording for a long span of time, ensure there is sufficient storage space in your device.
Clean up Your Screen
Another aspect of your device you need to get ready before recording your screen is the screen itself. Remove any unneeded icons, folders or files from your desktop, and close any non-required applications. An uncluttered screen makes for a clearer, more professional-looking recording. If the recording is intended for a presentation, tutorial or for sharing with others, it’s advisable to have a neat and clean screen for a more focused and engaging viewing experience.
- Make sure you’re connected to a reliable power source
- Prepare your Audio Inputs
If you’re planning on recording a long session, or don’t want to risk your laptop shutting down because of a depleted battery, it’s advisable to plug your device into a power source. You don’t want your recording session to be interrupted, as this could impact the flow of your content and make the editing process more complex.
If your recording involves voice-over or any other audio, check to make sure your microphone is working effectively. Test it before starting the recording to ensure there are no glitches or unwanted noise. If you’re using an external microphone, make sure it’s properly connected to your Dell laptop and is set as the default device for sound input.
In conclusion, a successful screen recording isn’t just about hitting the record button: it calls for adequate preparation. By following these steps, you’ll be well on your way to creating effective screen records on your Dell laptop.
Looking Into the Built-In Features for Capturing Screen Activity in Windows
When it comes to capturing screen activities on your Dell laptop that’s running Windows, you have several built-in tools at your disposal. These tools are efficient, simple to use, and require no extra downloads or installations.
Built-in Game Bar for Recording
Windows 10 comes equipped with the Game Bar, a feature which originally designed for gaming yet widely used for general screen recording. With easy-to-access controls and high quality output, it’s an excellent option for recording tutorial videos, live streams, and more.
You can activate Game Bar by pressing the Windows key + G simultaneously. A control bar will appear, which holds various options for capturing screenshots and recording video segments. Bear in mind, certain applications might not support Game Bar recording.
Another Built-in Method: Steps Recorder
Another feature available on Windows is the Steps Recorder. This utility is ideal if you’re looking to record multiple steps, particularly useful in documenting procedures or troubleshooting steps.
Access the Steps Recorder by typing steps recorder into the search bar on your taskbar and hitting Enter. From the window that pops up, simply click Start Record. Everything you do on your computer will be recorded until you hit Stop Record.
Furthermore, these built-in tools ensure your privacy and security on your Dell laptop. They don’t require third-party downloads, which could potentially carry risks.
- Game Bar: Useful for recording any type of computer activity, from gameplay to tutorial videos.
- Steps Recorder: Best for recording procedural or troubleshooting steps.
Recording your screen on a Dell laptop can be accomplished efficiently using the built-in features offered by Windows. Whether you choose the Game Bar or Steps Recorder, these tools provide various functionalities that can fit different recording needs.
Steps to Utilize Xbox Game Bar for Recording Screen Activities on a Dell Notebook
The Xbox Game Bar is an in-built tool primarily designed for Windows to enhance gaming experiences. However, it can also be used to capture screen activities including gameplay on your Dell laptop. If you are unsure of how to do this, this detailed guide will walk you through every step of the process.
Activating the Xbox Game Bar
First and foremost, you must make sure that the Xbox Game Bar is enabled on your Dell laptop. Navigate to Settings > Gaming > Xbox Game Bar, and turn the switch on if it isn’t already.
Start a Screen Capture
Once your Xbox Game Bar is enabled, press the Windows key along with the G key simultaneously to open it. On the screen that appears, click on the ‘Capture’ widget and press the red ‘Start Recording’ button to start documenting your screen activities.
Ending and Accessing Your Recording
When you have finished recording, you can halt the capture by pressing the stop button on the capture bar. To access the recorded clip, head to the Gallery section of the Game Bar or go directly to the Videos -> Captures folder on your computer. You can then view, edit, or share your recording as desired.
It is critical to note that while the Xbox Game Bar is an accessible and straightforward tool for screen recording, it can only capture in-game footage, apps and browser windows if they are open in the foreground. It does not record the full screen, file explorer or certain sections of the screen.
Customizing Your Recording Preferences
You can adjust the Game Bar’s settings to suit your recording preferences. Visit the settings menu to alter the audio levels, video quality, and frame rates of your recording, among other things.
In summary, screen recording on a Dell laptop using the Xbox Game Bar is a simple and uncomplicated process, providing you with high-quality, customizable captures of your gaming or browsing sessions.
Utilizing External Applications for Capturing Screen Activity on Dell Laptops
While Dell laptops come with built-in tools for screen recording, external applications can often offer more features and flexible controls. These third-party software can significantly enhance the process of capturing your screen activity effectively.
Understanding External Screen Recording Tools
External software for screen recording is applications developed by other companies, designed exclusively for capturing and sometimes editing the screen activities. These tools often come with added features such as a customizable recording area, audio inclusion from a microphone or system audio, and webcam capture. Some applications even offer real-time editing and advanced post-production tools.
Remember, before downloading any third-party software, it is essential to check its compatibility with your Dell laptop. Furthermore, ensure the software is from a reliable source to prevent exposure to possible security risks.
How to Use Third-Party Software for Screen Recording
- Download and Install: Choose a reliable screen recording program from online sources and download it. Once the file is downloaded, follow the instructions to install it on your Dell laptop.
- Customize settings: After installation, open the application. You will often be presented with various setting options. Customize these settings according your needs.
- Start Recording: With everything set up, you can begin with the screen activities you wish to capture. Most applications involve a simple button for ‘Record’ or ‘Start’ to initiate the screen recording.
- Save and Edit: After recording, save your video in your desired format. Some software provides options for editing the recorded video.
There are a plethora of third-party software available for screen recording on a Dell laptop. Each software differs in its functionalities and user interface, hence choose one according suits your requirements the most.
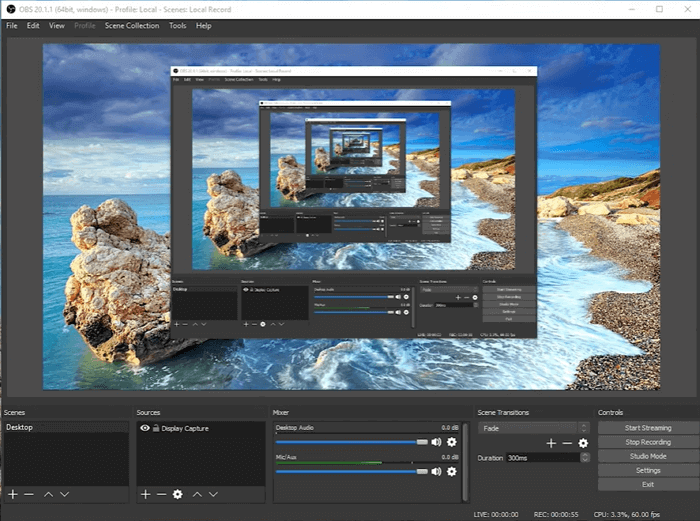
A Comprehensive Manual on Leveraging OBS Studio for Screen Capture
OBS Studio, also known as Open Broadcast Software Studio, is a popular choice for screen recording, particularly for users with varied recording needs. Let’s dive into a detailed, step-by-step process on how to use OBS Studio to record your screen efficiently.
Installing OBS Studio
Before you can start recording, you must have OBS Studio installed on your Dell laptop. Download the latest version from the official OBS Studio website, and follow the installation instructions provided. Remember to restart your system after installation to ensure the software runs smoothly.
Setting Up the Scene
With OBS, you can organize related sources into scenes, simplifying the recording process. To set up a new scene, click the ‘+’ icon under the ‘Scenes’ box. Give your scene a name. You’re now ready to add sources to your scene.
Adding Sources to Your Scene
Sources are the elements that show up in your recording. They could be a browser window, your full screen, an image, game capture, etc. To add a screen capture source, click ‘+’ in the ‘Sources’ box and select ‘Display Capture’. Name your source and adjust the settings according to your preferences.
- Arranging and Transforming Sources
- Setting Audio Options
Drag and drop the sources to arrange them on your canvas. You can resize or transform each source to fit your visual design by right-clicking them and selecting ‘Transform’.
In the mixer, choose the audio source/s that you want to include in the recording. Similarly, mute the ones you don’t require or adjust their volume.
Start Recording
Once youre satisfied with the scene and source settings, select ‘Start Recording’ from the ‘Controls’ box. When you want to stop recording, simply hit ‘Stop Recording’ in the same box. Your recording will be saved in the desired location.
This guide should help you get started with using OBS for screen recording. The software is incredibly versatile and may take some time to master; don’t hesitate to experiment based on your recording needs and eventually, you will become efficient at screen recording using OBS Studio.
Effective Methods for Capturing Screen Activity on a Dell Laptop
Screen recording on a Dell notebook can be a simple task when properly equipped with knowledge and applicable tools. It’s a process that is especially useful for tutorials, presentations, and troubleshooting. Here are a few tips to help you capture screen activity on your Dell device more efficiently.
Use a Reliable Screen Recording Tool
There are numerous software available for capturing screen content, ranging from built-in options like Game Bar for Windows 10 to third-party applications such as Camtasia. It’s advisable to select a screen recording tool that suits your needs in terms of output format, editing features, and ease of use.
Prioritize software stability and compatibility with your Dell laptop to avoid any interruptions or complications during the recording process. It’s also preferable to choose a tool that allows for voice-over recording, as this would eliminate the need for an external microphone or additional audio recording processes.
Ensure Optimal System Performance
Running high-definition screen capture can be quite demanding on system resources. To ensure a smooth recording experience, close any unnecessary applications that may be running in the background. These may consume valuable processing power and potentially disrupt your recording session.
You can boost your Dell laptop’s performance prior to recording by clearing your browsing data, deleting temp files, and running a disk clean-up. If possible, also temporarily disable system updates to prevent any sudden restarts during your screen capture session.
Check Your Output Settings
At all times, pay a close attention to your output settings. This ensures that the end result is in line with your desired quality and format. Key settings to consider include the resolution, frame rate, and audio quality. It’s worth noting that higher settings will demand more from your laptop and result in larger file sizes. Always attempt to balance output quality with system performance and storage restrictions.
Modifying and Storing Your Captured Screen Videos
After an effective capture of your laptop screen activities, the next step involves refining and storing the produced video. This guide will outline a step-by-step process in relation to making modifications and safely storing your videos.
Modifying Your Captured Screen Video
The first step in the modification process often involves examining the recorded content for unnecessary segments. Using a video editing software, you can remove sections which don’t add any value to the video. This is often done through a ‘cut’ or ‘trim’ feature found in most video editing software.
Enhancing Video Quality: You can also adjust the video quality settings like brightness, contrast, and saturation to enhance the overall appearance of your video. In some cases, you might want to add text annotations or call-outs to make the video content more understandable.
Adding Sound Tracks: It might be desirable to include audio tracks in your screen recorded videos. You can either record a voice-over narration or insert background music to enhance the viewer’s experience.
Saving Your Modified Screen-Recorded Video
After making the necessary edits, the next step is to save the modified video. First, confirm your edits and make sure that everything is as you want it to be. The save function is often located in the ‘File’ menu of the video editing software, but some applications may have an auto-save feature activated.
Saving Formats: Most video editors offer various options when it comes to the video formats in which you can save your projects. File types such as .MOV, .MP4, or .AVI are commonly used. The format you choose should be supported by the platform where you plan to upload your video.
Storage Location: Having defined the format, you ought to select an appropriate place to store the video file. It helps to create a dedicated folder where you can easily locate your saved screen recorded videos.
Following these steps will ensure that you successfully edit and store your captured screen videos effectively.
Fixing Common Problems Experienced During Screen Capture on Dell Notebooks
While Dell laptops provide robust performance for a variety of tasks including screen recording, users may encounter some challenges in the process. This article will address some of the common issues regarding recording screens on your Dell notebook and provide solutions to help you navigate these problems effectively.
Solution for Poor Video Quality and Frame Drops

If you’re experiencing poor video quality or frame drops during screen capture, it may be due to overburdened system resources or outdated graphic drivers. To alleviate this, you can try:
- Closing unnecessary programs and background tasks to free up system resources.
- Updating your laptop’s graphic drivers.
- Lowering the recording resolution or frame rate.
Fixing Audio Issues during Screen Recording
Audio issues can occur if the microphone settings are misconfigured or if your laptop’s audio drivers are not up-to-date. If you’re facing this, consider the following fixes:
- Check your recording software’s microphone settings to ensure they’re configured correctly.
- Update your laptop’s audio drivers.
Dealing with Recording Software Crashes
Screen recording software may crash if its not compatible with your Dell’s operating system or if the software is not updated. Here’s what you can do to avoid this issue:
- Check if the software is compatible with your operating system and update it regularly.
- Ensure your Dell laptop’s operating system is up-to-date.
In conclusion, most issues related to screen capture on Dell laptops can be fixed by keeping your laptop’s software and drivers updated, monitoring system resources, and ensuring the correct configuration of your recording software. However, if the issue persists, contacting Dell’s support team or the screen recording software’s customer service may be beneficial.
Enhancing Your Dell Laptop’s Abilities for Superior Screen Capturing
Improving your Dell laptop’s capacity for efficient screen capturing involves multiple internal and external adjustments. These optimizations can contribute significantly to achieving a smoother, crisper and high-quality recording free of lags and stutters. Let’s delve into these enhancements.
System Upgrades
The performance of any screen-capture software directly corresponds with the strength of your system’s performance. It’s often recommended to start with ensuring your system has enough Random Access Memory (RAM). Adequate RAM ensures smooth functioning of the recording software without overloading the system.
Upgrading your system’s Graphics Processing Unit (GPU) can also significantly enhance screen capturing capabilities. Some of the more advanced recording programs leverage the GPU to provide higher-quality recordings. Thus, an up-to-date, powerful GPU can substantially improve the quality of your recordings.
Optimal Software Selection
Choosing software that fits your system’s specifications well is integral to maximizing recording quality. Pick a screen recording tool that does not consume excessive memory, but also provides the level of functionality and recording quality you need. Its a delicate balancing act, but it ensures that your system will not lag or run slowly during the recording process.
Environment Preparation
Avoid running unnecessary applications in the background when youre about to record your screen. These extra applications can usurp system resources, leading to inferior quality recordings. Streamlining your systems tasks allows for more resources to be directed towards your screen recording tool, offering a more stable recording experience.
System Settings Fine-tuning
Windows offers a range of settings that can be optimized for better performance. Adjusting screen resolutions, color accuracy settings, and sound settings are just a few tweaks you can do before you start recording. Ensure you fine-tune your screen brightness, contrast, and volume settings for a perfect visuals and audio.
FAQ How to screen record on dell laptop:
What are some methods to optimize my Dell laptop for better screen recording?
Some methods include updating your laptop’s software, optimizing your settings for performance, closing unnecessary running programs, getting a high-quality screen recording tool, and ensuring adequate space in your hard drive for the recording.
Why is it important to update my software before screen recording?
Running the latest software helps ensure optimal performance and security as you screen record. This includes updating your operating system, screen recording tool, and other relevant software.
How does optimizing my laptop’s settings improve screen recording?
Optimizing your settings for performance helps ensure smooth screen recording. This could include adjusting resolution, disabling unnecessary animations and graphical effects, and managing power settings for optimal performance.
Why should I close unnecessary running programs when screen recording?
Running programs consume system resources. Closing unnecessary ones can free up resources, helping your Dell laptop handle the demands of screen recording more efficiently.
How do the quality of screen recording tools affect my recordings?
A high-quality screen recording tool can offer better features and capabilities, from resolution and frame rate options to editing and annotating tools. These can help you create the best possible screen recordings.
Why do I need to ensure adequate hard drive space before starting a screen recording?
Screen recordings can take up significant storage space, particularly high-resolution recordings. Ensuring you have enough hard drive space prevents recording disruptions due to storage constraints.
Most Popular Articles

Downgrade Ios 16 Without Losing Data – Downgrade From Ios 17 to Ios 16

Decoding the Tesla Key Fob: A Comprehensive Guide to Its Features, Benefits, and Usage Tips

Apple TV Remote Not Working? Troubleshoot and Fix the Issue

Hisense Tv no Sound Fix Hisense Tv Sound Not Working Smart Tv
Intel Core i7 13700k vs Intel Core i7 12700k Which cpu Processor Reigns Supreme?

Plan B: AMD Ryzen 5 5600G as graphics card alternative.