Step-by-Step Guide on How to Rotate Screen on a Dell Laptop
Step-by-Step Guide on How to Rotate Screen on a Dell Laptop
Contents
show
Most individuals have, at some point, accidentally changed the orientation of their laptop screen and then struggle to revert it back to its original state. While this can certainly be a frustrating experience, altering your screen’s orientation on a Dell laptop (be it 90, 180, or 270 degrees) can easily be done in a few, simple steps.
In this article, we’ll present a clear, systematic manual to help those who need to adjust their Dell laptop display’s orientation for whatever reason – whether it’s for a more comfortable viewing angle, for easier collaboration with others, or to accommodate a unique workstation setup.
We’ll take you through the steps needed to achieve this by using Windows’ built-in display settings, and will also offer solutions to a couple of potential issues that might hinder this process. Before we proceed, however, please ensure you’re taking these steps on a Dell laptop, as the process might slightly vary depending on the make and model of your device.
Whether you’re a novice user or savvy with technology, you’ll find this guide to be concise, easy to follow, and most importantly, effective in getting your Dell laptop screen to reflect the way you want it to.
Grasping the Importance of Changing the Screen Orientation on a Dell Portable Computer
At first glance, the notion of changing the viewpoint of your Dell laptop screen might seem needless. However, upon deeper exploration, it becomes clear that it can be particularly useful under certain conditions. Changing screen orientation can not only allow for a more comfortable viewing experience but can also optimize specific tasks, improving your overall productivity.
Why Would One Consider Changing the Orientation of the Display on a Dell Laptop?
- Increasing the field of view: By rotating the screen 90 degrees, you can enhance the vertical view. This is particularly useful for tasks that involve scrolling through long vertical documents or web pages.
- Optimizing for specific applications: Some software, such as certain design or drawing applications, can be more conveniently operated with a rotated display.
- Improving ergonomics: In some scenarios like long-term reading or coding, changing the screens perspective can help reduce strain on your neck and eyes.
- Adapting to space constraints: If you find yourself in an environment with limited space, altering your screen’s orientation could allow for a more compact setup.
Now that you understand why you might want to change the orientation of your Dell laptop’s display, it’s essential to learn how to accomplish this task. The procedure is quite simple and can be done in just a few clicks. However, one must exercise caution, as improper steps could disrupt the user interface.
So now, whether you’re a digital artist needing a rotated canvas, a data analyst scrolling through large spreadsheets, or someone simply looking to accommodate space constraints, know that changing the display orientation on your Dell portable computer can significantly enhance your user experience.
Things to Keep in Mind Before Changing the Orientation of Your Dell Laptop’s Display
Before you proceed with altering the orientation of your screen on a Dell laptop, there are a few important considerations that should be taken into account. While the process itself is straightforward, neglecting these precautions might lead to unnecessary confusion or even harm the laptop.
Make Sure No Programs are Running
Before making any adjustments, ensure that no software or applications are running. Some applications may not respond well to a sudden change in screen orientation and might crash, lose data, or behave unpredictably. Make certain to save and close all running programs.
Confirm the Compatibility of the Display Settings
Not all display settings may be compatible with screen rotation. Moreover, some older or specific laptop models might lack this feature altogether. Therefore, check and confirm the compatability of your Dell laptop’s model and display settings with the screen rotation feature.
Secure Your Laptop
Keep the laptop securely placed on a flat surface. Adjusting screen orientation would necessitate physically rotating the laptop, and it’s best done when the device is securely placed to prevent any accidental slips or falls.
-
- Prepare for the Change in Navigation
It’s important to understand that once the screen orientation changes, the trackpad or mouse navigation will also alter accordingly. This might be slightly disorienting at first. Hence, be prepared for this adjustment.
-
- Robust Battery Life or Power Connection
Make sure your laptop is fully charged or connected to a power source during this process. This will help to avoid system crashes, in case the computer’s battery exhausts during the process.
By adhering to these precautions, the process of changing your laptop’s screen orientation can be done smoothly and effectively.
How to Change Screen Orientation on a Dell Laptop with Integrated Intel Graphics
Altering the display direction of your Dell laptop featuring Intel graphics hardware is a straightforward process. This feature can be extremely useful in various scenarios, such as when you’re using your laptop as a secondary display or showing a presentation.
Using Intel Graphics Control Panel
One of the simplest methods to rotate screen involves utilizing the Intel Graphics Control Panel. This control panel, designed specifically for Intel integrated graphics, lets you easily alter a variety of display settings on your Dell laptop. Here’s a step-by-step guide:
- Right-click on an empty area on your desktop, and in the context menu that pops up, select ‘Graphics Properties….
- In the control panel that opens, choose ‘Display.’
- Look for the ‘Rotation’ feature under the ‘General Settings’ tab.
- Click on the drop-down menu beside ‘Rotation,’ and choose the orientation you desire it can be 0, 90, 180, or 270 degrees.
- Once done, click ‘Apply,’ then ‘Ok’ to save changes.
Note: It’s recommeded to have all applications closed before rotating the screen to avoid graphical glitches.
Using Keyboard Shortcuts
If you’re searching for a more rapid approach to flip the screen orientation on your Dell laptop empowered with Intel graphics, you may use key combinations. This allows for instant screen rotation without the need to navigate through multiple screens.
- Hold down ‘Ctrl + Alt’ keys together on your keyboard.
- Whilst keeping those two keys pressed, hit one of the four arrow keys:
- ‘Up’ arrow for normal or 0-degree rotation.
- ‘Right’ arrow for 90-degree rotation.
- ‘Down’ arrow to turn the screen upside down or 180 degrees.
- ‘Left’ arrow for 270-degree rotation.
Take note: The keyboard shortcut may differ, or not perform if your Dell laptop is not using the default Intel graphics driver or if hotkeys are disabled in the Intel Graphics Control Panel.
Procedure to Adjust the Display Orientation on your Dell Laptop
If you want to adjust the screen orientation of your Dell laptop, you can easily do so via the display settings. Proceed with these handy steps:
- Go to your desktop and right-click on an empty space. This will trigger a drop-down menu.
- Select the option named ‘Display settings’ or ‘Screen resolution’ from the menu. This will open a new window.
- In the display settings window, search for an option named ‘Orientation’.
- Clicking this ‘Orientation’ option will expose a drop-down menu with different choices: Landscape, Portrait, Landscape (flipped), and Portrait (flipped).
- Select your desired screen orientation and click ‘Apply’.
Once you click ‘Apply’, your laptop screen will immediately change orientation. However, note that this change is preliminary, as Windows will then ask you to confirm if you want to keep these settings. Your screen will revert back to its original setup if you do not confirm within 15 seconds.
If everything on your screen looks good and you are satisfied with the new orientation, confirm the changes. This will save your preferred orientation as the new default.
In conclusion, adjusting the screen orientation on a Dell laptop is a simple process that involves a few clicks in the display settings. Be sure to adjust and experiment with the options available to achieve a comfortable viewing experience.
Turning the Display Orientation of Your Dell Laptop with Keyboard Shortcuts
Most Dell laptops allow you to change the screen orientation through a set of pre-defined keyboard shortcuts, also known as hotkeys. This is an extremely useful feature when you need to flip your display due to various reasons such as screen presentation, graphic design workflow or general preferences.
Step by Step Guide Using Keyboard Shortcuts
To begin the screen rotation process, you simply press and hold the Control (Ctrl) and Alt keys on your laptop’s keyboard. While these keys are held down, press the arrow keys to determine the direction you’d like to rotate the screen.
- Ctrl + Alt + Right Arrow: This will rotate your Dell laptop screen 90 degrees to the right.
- Ctrl + Alt + Down Arrow: This will turn your display upside down, rotating it 180 degrees.
- Ctrl + Alt + Left Arrow: This will rotate your screen 90 degrees to the left.
- Ctrl + Alt + Up Arrow: This will restore your screen to its normal, standard position.
Please note, these shortcuts may not work if your computer’s graphic drivers are not updated or if they do not support hotkey rotation. In such cases, you would have to manually change the orientation from your computer’s display settings.
Accomplishing a screen rotation on your Dell laptop using keyboard shortcuts is a simple yet effective solution when needed. However, always remember to use this function with care, as extreme changes in screen orientation can cause disorientation and have potential consequences on your workflow.
Altering the screen orientation of a Dell laptop can be easily achieved through the Nvidia Control Panel. This comprehensive utility by Nvidia provides a user-friendly interface for adjusting your display settings.
Accessing the Nvidia Control Panel
First, you need to access the Nvidia Control Panel. Right-click on your desktop background and select ‘Nvidia Control Panel’ from the dropdown menu. If it is not visible there, you can find it in the Windows Control Panel under ‘Hardware and Sound’. Please note that in order for the Nvidia Control Panel to appear and work, the Nvidia driver should be installed in your Dell laptop.
Once you open the Nvidia Control Panel, you may notice a variety of settings that can be adjusted, from 3D settings to PhysX configurations.
Screen Rotation Process via Nvidia Control Panel
For changing the screen orientation, we’re interested in the ‘Display’ category on the left-hand side of the Nvidia Control Panel. Here, choose ‘Rotate Display’ from the options presented. In this menu, you can choose the screen orientation that best suits your needs. The options include Landscape (default), Portrait, Landscape (flipped), and Portrait (flipped).
Simply select the desired screen orientation from the radio buttons and click ‘Apply’. A confirmation dialog box will appear, proposing to keep the changes or revert back if the new orientation is not satisfactory. If you’re content with the new setting, click ‘Yes’ and your Dell laptop screen will stay in the chosen position.
Note: Be sure to close any open applications before altering your screen orientation to prevent any issues or loss of data.
The Nvidia Control Panel is a capable tool for customizing your display on a Dell laptop, including a simple process for adjusting screen rotation. It proves essential in instances when you need to mitigate windows distortion, optimize application displays, or simply change your viewing experience.
Mastering the Rotation of Your Dell Laptop Display using AMD Catalyst
There might be certain moments when you find the need to flip or turn the display of your Dell laptop. Whether that’s for an easier way to view certain documents or for certain game settings, you can modify your laptop’s display via AMD Catalyst. Here’s a step-by-step guide.
Step-By-Step Instructions to Tweak your Display through AMD Catalyst
Before you start the process, ensure that AMD Catalyst is installed and running on your Dell laptop. You can download the latest version, should you not have it, from the AMD’s official website.
- Start by right-clicking on an empty area of your desktop. This should bring up a list of options.
- Select ‘AMD Catalyst Control Center’ from the options. This will launch the control center on the screen.
- Once you have the control center open, look for the option that reads ‘Desktop Management’. Click on it.
- In the desktop management menu, locate and click on ‘Desktop Properties’.
- By clicking on ‘Desktop Properties’, a new set of options will appear. Here, you need to select ‘Rotate Desktop’.
- From the given options, you can choose to do a 90-degree, 180-degree, or 270-degree rotation. Select the orientation that works best for your needs.
- Finish by clicking on ‘Apply’, then close the control center.
Remember, it’s important to be sure of the orientation you want. In some cases, unusual orientation might affect the way you use your touchpad or mouse. Enjoy the versatility of your Dell laptop’s display and tweak it according to your needs.
Changing the Direction of Display on a Dell Laptop
Adjusting your Dell laptop’s screen direction is a simple task that does not require technical expertise. Whether you need a vertical monitor for coding or have accidentally flipped the screen, reversing the display orientation can be done using a few methods.
Utilizing Keyboard Shortcuts
Most Dell laptops possess an easy keyboard shortcut that lets you rotate the screen. Ctrl + Alt + Arrow key is typically the standard combo. The arrow key direction corresponds with the screen rotation. For instance, pressing the down arrow would flip the screen upside down.
You can press Ctrl + Alt + Up Arrow to revert the screen back to the normal orientation.
Employing the Display Settings
If the keyboard shortcut fails, use the Device settings to adjust the orientation. Here’s how:
- Right-click an empty area on your desktop and select Display settings.
- Scroll down to the Orientation dropdown menu.
- Change your choice to Landscape (flipped) to rotate the image 180 degrees.
- Select Apply to make the change.
Windows will ask you to confirm this change since it considers it significant. Once you agree, your screen will invert. To reverse the orientation back to normal simply follow the same steps and choose Landscape.
Using Graphics Options
If you have a graphics card installed, it might come with proprietary control software that can adjust the screen’s orientation. Check it by right-clicking on your desktop to see if there are any Graphics Options or Graphics Properties.
Remember that these steps are specific to Dell laptops, and may vary for different models and operating systems.
Solving Issues When Changing the Display Orientation on a Dell Laptop
If you are having problems when trying to change the screen alignment on your Dell laptop, this guide is for you. By following the steps mentioned, you can troubleshoot possible issues and apply effective solutions.
Understanding the Causes Behind the Problem
Generally, experiencing difficulties when trying to adjust the display alignment in your Dell laptop could stem from software issues, outdated drivers, or even your system’s graphics hardware. It’s important to identify the cause first before proceeding with any fixes.
Software issues:
Operating System glitches may cause complications in adjusting the screen alignment. For instance, a previous improper shutdown or an unsuccessful update can result in system bugs, preventing the rotation setting from functioning as it should.
Outdated drivers:
Drivers are software that allows your laptop and the operating system to communicate with each other. If your drivers are outdated or incompatible, it may create problems in changing the screen orientation.
Graphics hardware:
In some cases, the issue might stem from a malfunctioning graphics card or built-in graphics chip, which controls the display. Thus, making adjustments to the screen may become challenging.
Effective Solutions
- Updating your drivers: Make sure your drivers, especially the graphics driver, are up-to-date. You can accomplish this by visiting Dell’s official website and looking for the latest driver versions compatible with your laptop model.
- Running a hardware diagnostic: Dell laptops usually come with built-in diagnostic tools. Running a hard drive diagnostic can help determine if there are any issues concerning the laptop’s graphics card or chip.
- Performing a system restore: If the issue persists despite updating the drivers, consider performing a system restore. Ensure to back up any vital data before beginning the process.
Having a Dell laptop display that won’t turn as needed can be frustrating. Still, by addressing these potential causes and implementing the solutions listed, you can rectify the situation and maximize your laptop’s functionality and user experience.
Procedure to Alter the Orientation of Your Display on a Dell Laptop Without the Use of a Mouse
Quick Keyboard Shortcuts
Moving the display orientation of your Dell laptop can be a real chore using the touchpad only. Thankfully, there are keyboard shortcuts that can help you complete this task quickly. It is crucial to note that these shortcuts might not function on all Dell models or operating systems.
You can use the shortcut Ctrl + Alt + Arrow key. Depending on the Arrow key you utilize, your screen adopts a different orientation. When you want to return your screen to the normal position, simply press Ctrl + Alt + Up Arrow.
Change Screen Orientation Through Settings
It’s also possible to adjust the orientation of your laptop’s display via the system settings. This method may be longer, but it provides the exact same result. Below is a simple process to help you accomplish this without a mouse.
- Use the Windows key to open your Start menu and use the Arrow keys to navigate to the ‘Settings’ option, then hit Enter.
- Among the numerous settings available, find ‘System’ and press Enter. You can use the Tab key and Arrow keys to navigate if needed.
- Once you’re in the System settings, find ‘Display’ and hit Enter.
- In the Display menu, use the Tab key to navigate to ‘Orientation’ and change the settings according to your preference, then hit Enter to save your settings.
Adjusting the screens alignment of your Dell laptop without the use of a mouse can be that simple. Ensure to familiarize yourself with these steps, the different shortcuts, and the settings configurations for efficient usage.
Expert Advice for Changing the Display Orientation on a Dell Notebook
If you frequently need to adjust the display orientation of your Dell notebook for presentations or personal convenience, it will help to know a few professional suggestions. It’s a relatively simple adjustment, but knowing the best practices will ensure you avoid potential complications and make the process even more straightforward.
Understanding Keyboard Shortcuts
Experts often recommend using keyboard shortcuts, as they make the entire process quick and easy. On a Dell computer, press the Ctrl + Alt + Arrow keys together. The arrow key you press determines how the display will turn. For instance, pressing the down arrow will flip the screen upside down, while the right or left arrow will rotate the screen 90 degrees in the respective direction. Notably, this method only works if the necessary graphics options are enabled on your notebook.
Alternatively, you can adjust the display from the settings menu in Windows. This may seem longer but is a surefire way if the shortcuts are not working. Here are the steps:
- Right-click on your desktop and choose Display settings.
- Under Orientation, you’ll find various options like Landscape, Landscape (flipped), Portrait, and Portrait (flipped).
- Choose the desired orientation and click on Apply. Confirm the changes when prompted.
Remember to always ensure you have the most current display drivers installed. Outdated or incorrect drivers can lead to difficulties when trying to rotate the screen. You can download the latest drivers directly from the Dell website. Also, some graphics software applications have their own settings for screen rotation, which may override the default windows settings. So, check those applications and ensure they are not interfering with your screen rotation.
In the rare case you can’t get your screen rotation back to normal, don’t panic. You can return the orientation to normal by opening the settings menu in safe mode and resetting the display to the default landscape orientation.
Ensuring Display Quality Post Rotate the Screen
When adjusting the presentation view on your Dell laptop, it’s crucial to ensure the quality of the display remains paramount. Altering the screen orientation should not compromise the visual experience. You must take certain steps to maintain seamless visuals after changing the orientation of the screen.
Maintaining Resolution
Adjusting the screen resolution appropriately is key to maintaining the quality of the display after flipping the screen’s orientation. Start by right-clicking on the empty space on your desktop and select Screen resolution. From there, adjust the settings to a resolution compatible with the flipped orientation. For example, a widescreen view typically has a resolution of 1280×800; when flipped, it can still look clear at 800×1280.
The same steps apply to older versions and newer versions of the Windows operating system. The advantage of adjusting the resolution, is the option to revert to the previous settings if the quality of the display deteriorates.
Graphic Driver Update
Keeping your graphics drivers updated is another critical aspect of preserving display quality. These updates typically include compatibility enhancements that may improve visuals when changing screen orientation. If need be, these updates can be downloaded directly from Dell’s website or from the graphics card manufacturer’s website.
- Check for updated drivers regularly
- Download and install them promptly
These updates can not only help maintain the display quality but also improve overall system performance.
Use of Screen Rotation Software
If the above measures don’t yield the desired results, you can opt for screen rotation software. Tools like iRotate and Pivot Pro offer advanced features that help maintain, if not improve, the clarity and resolution of your screen upon rotation. These software are user-friendly and allow for swift and easy screen orientation adjustments without affecting the display quality.
FAQ How to rotate screen on dell laptop:
How can you easily rotate a screen in Windows 10 if you’re using a tablet?
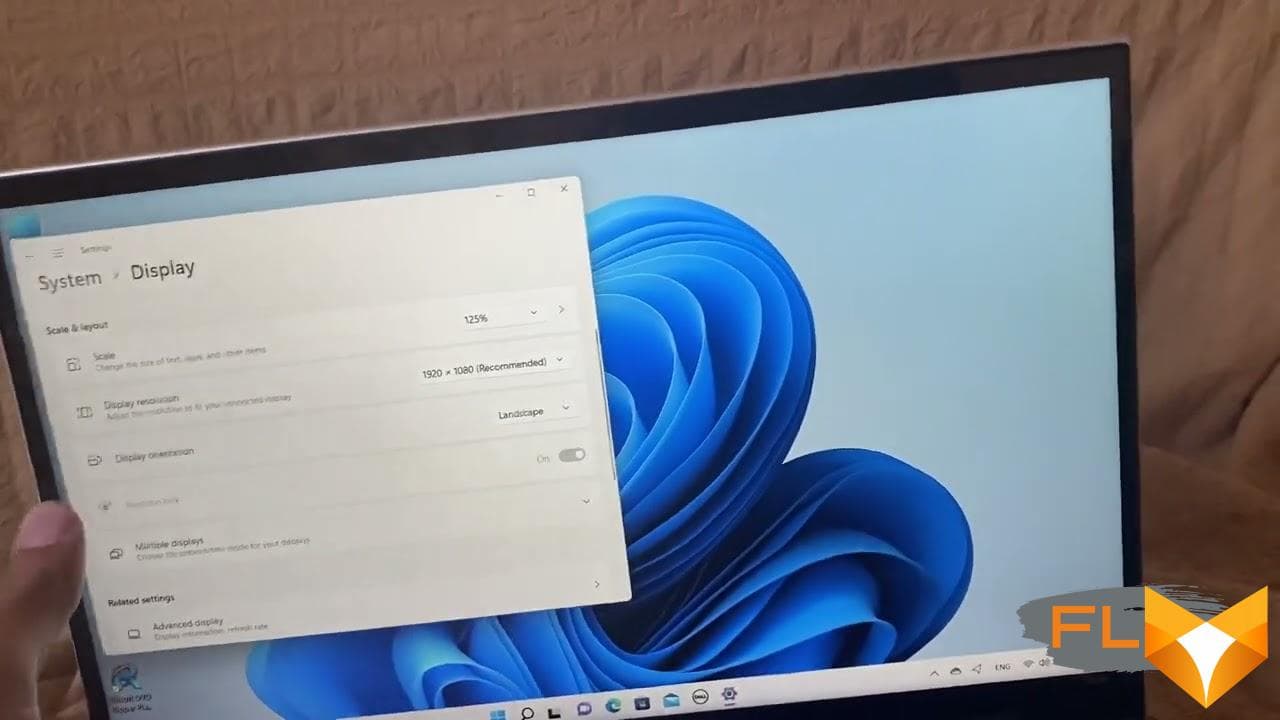
If you’re using a Windows 10 tablet, you can easily rotate the screen by going to Settings > System > Display, and under the “Orientation” menu, select either “Landscape” or “Portrait” mode depending on your preference. This adjusts the display to either a horizontal or vertical view.
Is there a way to rotate a Dell Chromebook screen into portrait mode?
Yes, you can adjust the orientation of your laptop screen on a Dell Chromebook by accessing the display settings in the Chromebook’s menu. Look for the option to rotate the screen and select either 90 or 270 degrees to change it to portrait mode.
What’s the process to flip the display on a computer screen using Windows 11?
In Windows 11, right-click on the desktop, select “Display settings,” and in the settings window, search for the “Orientation” drop-down menu. From there, you can select “Landscape” or “Portrait,” depending on the direction you want.
If my screen is sideways, what are the shortcut keys to correct it in Windows 10?
If your screen is sideways, you can quickly correct it by using the shortcut keys Ctrl + Alt + Arrow key (up, down, left, or right) depending on the desired orientation. This will rotate the screen in the direction you want.
Do you know how to rotate a PC screen using the service tag on a Dell 2 -in-1 laptop?
The service tag on a Dell device is used primarily for identification and support services, not for adjusting settings. To rotate your screen, go into the display settings in your operating system, and find the “Orientation” option. From there, you can select the preferred position (Landscape or Portrait).
I can’t find the option to rotate my screen in Windows 10 on my desktop, is this a common issue?
Yes, it’s a common issue, especially if the rotation function is disabled in the graphics card settings or if the installed drivers do not support rotation. You might need to access the settings directly through your graphics card’s software or update the drivers to the latest version.
Can I use Windows 10 settings to adjust the orientation of my laptop screen to portrait view?
Absolutely, in Windows 10, you can adjust the screen orientation by navigating to Settings > System > Display. Under the “Orientation” dropdown, you’ll have the option to select “Portrait” to change the screen to portrait view.
Is it possible to flip the display on a Dell Chromebook using shortcut keys?
Yes, on many Chromebooks, you can flip the display by using the keyboard shortcut Ctrl + Shift + Refresh (or F3). The screen will rotate 90 degrees with each press, allowing you to easily adjust the orientation.
Is there an icon I can use to rotate my screen in Windows 11 without going into settings?
While there’s no default desktop icon in Windows 11 to rotate the screen, you can use the keyboard shortcut Ctrl + Alt + Arrow Key to rotate your screen without needing to access the display settings.
How do I fix a screen that’s stuck in landscape mode on my tablet running Windows 10?
If your tablet screen is stuck in landscape mode, you should check if rotation lock is enabled. If it is, disable it from the action center (click the notification icon on the taskbar to access it). If that doesn’t work, check your display settings to ensure that the orientation is set to “Auto” or “Portrait.”
Most Popular Articles

Which is the Best Printer for iPad in 2024? Wireless Printer For Ipad Best Airprint Printer
Review of Xeon E5 – 2640 v3 and Xeon E5-2678 v3 processors from Aliexpress: aliens from the past
Best Thermal Printer for Efficient Label Printer Small Business

Cheapest 4TB SSD m.2 nvme ssd review 2024 samsung 870 evo
4k Uhd Monitor Review Samsung UJ59 – uj59 4k Monitor Samsung u32j590
Why is My Laptop Screen Green? – Microsoft Tips to Fix Green Screen