Step-By-Step Guide on How to Safely Remove Hard Drive from Your Laptop
Step-By-Step Guide on How to Safely Remove Hard Drive from Your Laptop
Contents
show
At some point, every laptop owner may encounter a situation where they need to disassemble their machine. It might be for a simple storage upgrade, due to a malfunction of the hard drive, or even out of sheer curiosity. One of the trickiest parts of this process is safely extricating the hard drive. But worry not! We’re here to guide you through this cumbersome operation in the safest and most straightforward possible way.
The task of removing your laptop’s hard drive shall be made easy with this seamless, methodical guide. Whether you are conversant with the inner workings of a laptop or it’s your first time prying open the back cover, this plan is designed to cater to all levels of familiarity and competence. The information is organized meticulously, providing step-wise instructions that prevent causing any damage to the hard drive or the laptop.
The implementation of these steps allows the sparing of unnecessary repair costs that one could incur in case of damage. Remember, dealing with electronic devices always demands a certain level of caution. The reassurance lies within the knowledge that you are equipped with a guide that leads you on a confirmed path to success. So let’s dive right into the process!
Note: Always ensure you unplug any power sources and take anti-static precautions before working on your laptop to avoid potential damage and harm.
Grasping the Significance of Safe Hard Drive Ejection from Your Laptop
When dealing with the intricate hardware parts of your laptop, like the hard drive, it’s crucial to observe certain precautionary measures. Extracting the hard disk from your laptop isn’t merely about dislodging it. It’s paramount to implement the correct procedures to prevent any irreversible harm to your system.
Safe removal of the hard disk can be beneficial in many aspects:
- Preservation of Data: Abrupt or inappropriate removal of the hard disk can lead to the loss of valuable data. Even though some data might be recoverable, some could be lost forever. Hence, conducting a safe removal can reduce the risk of unintended data destruction.
- Preventing System Damage: Components of the laptop are interconnected. Any damage or mishap with one part can affect the whole laptop, leading to system crashes or booting issues. Thus, ensuring your laptop’s longevity lies in taking proper precautions when removing crucial components like the hard disk.
- Maintaining Disk Functionality: Removing the hard drive improperly can lead to its mechanical damage, thus rendering it dysfunctional. This might not only lose your stored data, but also lead to unnecessary expenses for disk replacement.
Moreover, the safe removal of a hard drive from your laptop isn’t a complex process. It generally involves a few steps, such as shutting down your system, removing the power supply, taking off the laptop’s bottom case, and subsequently, disengaging the hard drive. It’s always wise to follow a comprehensive guide or seek expert assistance if you’re unsure about the safe removal process.
In a nutshell, understanding the need for secure extraction of the hard drive can save you from potential data loss and hardware malfunction. As the old adage goes: ‘A stitch in time saves nine’ taking timely precautionary actions can save from future problems.
Different Types of Hard Drives and Their Unique Attachment Styles in Diverse Laptops
The diversity in laptop models is mirrored in the types of hard drives they use and how these drives are attached within the unit. There are primarily four types of hard drives:
- Hard Disk Drives (HDD): These traditional drives store data on a spinning platter, which is written and read by a moving actuator arm. Most often, these are secured in the laptop using screws and utilize a SATA interface for connection.
- Solid State Drives (SSD): Unlike HDDs, SSDs store information in microchips, eliminating the need for moving parts. This means that they are faster and more durable. They are usually fixed within the chassis via a proprietary connector or a SATA port.
- Hybrid Hard Drives (HHD): These drives combine the storage capacity of HDDs with the speed of SSDs. Their attachment method remains similar to that of conventional HDDs.
- External Hard Drives: These are separate drives used for additional storage or backup purposes and connect to the laptop through a USB port.
Before attempting to remove any hard drive, it is crucial to understand the various ways these drives are fixed inside laptops. Usually, this is done with a set of screws, but the location and type of screws used may vary based on the laptop manufacturer. For example, some Dell laptops have a specific bay for the hard drive that is accessed from the machine’s underside. HP laptops, on the other hand, may require partial disassembly to access the drive.
Most removable drive bays are located at the bottom, side, or under the keyboard. Generally, one would need to remove a casing or panel to access these bays. It’s important to be careful when working with these delicate components.
The Must-Have Instruments for the Process of Dismantling a Laptop’s Storage Drive
Before you take on the task of taking out your laptop’s hard drive, it is important to have all the required tools handy. Knowing the necessary tools can ensure a successful and safe hard drive removal.
Primary Instruments Required:
- Screwdrivers: Different laptops require different types of screwdrivers. Make sure you have a Phillps-head (#0 or #1) or a Torx screwdriver, often used in laptop assembly. These screwdrivers are critical for removing the screws holding the hard drive in place.
- Plastic Spudger Tools : These tools are perfect for prying apart casing parts without causing any damage. It’s important to avoid using a metal tool for this process, as they can cause severe damage to the internal components of your laptop.
- Anti-static Wrist Strap: While accessing the internal components of your laptop, you want to avoid causing any electrostatic damage. An anti-static wrist strap is a must-have for safe disassembly work.
If you are unsure about the tools needed, check the instructions or manufacturer’s details related to your specific laptop model. The process is generally simple, but having the right tools can help ensure a safe and effective hard drive removal.
Getting Your Laptop Ready for Hard Drive Extraction
Before you begin the process of extracting the hard drive from your laptop, there are several preparatory steps you must undertake to ensure the process is completed safely and efficiently.
Back-Up Crucial Data
One of the most critical steps is backing up your data. There’s a minor risk that some data could be lost or corrupted during the extraction process. Hence, it’s absolutely crucial you ensure that all important files and data are safely stored in a separate location.
Acquire Necessary Tools
Another essential part of preparation involves gathering all necessary tools. You will need the following:
- Screwdriver
- Anti-static wrist strap
- Plastic pry tools (optional)
While screwdriver is often enough, investing in a good anti-static wrist strap will safeguard your device from possible static discharge. Plastic pry tools can also be beneficial in removing delicate connectors without damage.
Powering Down & Disconnecting
Power down your laptop completely. This is not only to safeguard the machine itself but also to protect you from electrical shocks. Once shut down, unplug all cables that are connected to the laptop, including but not limited to the power cable and any peripheral devices. You should also remove the battery if it is accessible and detachable.
Identifying the Hard Drive Compartment
Finally, identify the specific location of the hard drive within your laptop. The hard drive compartment usually has an icon resembling a stack of CDs. If you cannot spot this, refer to your laptop’s manual or look up the model online. Make sure to keep this manual at your disposal for further reference, it might come handy during the extraction process.
The Correct Way to Turn Off Your Laptop Prior to Extracting the Hard Drive
Before initiating the process of extracting the hard drive from your laptop, it is crucial to turn off your machine correctly. This step ensures that your device and its components remain safe and in good working order during the removal process.
Here are the steps you need to follow to shut down your laptop the right way:
- Save and close any open documents or programs
- Navigate to the start menu
- Select the power option
- Choose to shut down your laptop
Note: The process of shutting down your laptop will close out all currently running applications. However, to be sure that you do not lose any unsaved progress in your work, take a moment to manually save and close out each program.
How: Click on the Windows icon located in the bottom left corner of your screen, if you are using a Windows system. Click on the Apple logo in the top-left corner of your screen, if you are using a Mac.
How: Once you have accessed the start menu, you will see an option that says ‘Power’ for Windows or ‘Shutdown’ for Macs.
How: Clicking the power option will give you a few different options. From this list, select ‘Shut Down’ to fully power off your laptop.
After you have followed these steps, give your laptop a few moments to fully shut down. The screen will go black, and all lights and sounds should stop completely. When this happens, you will know that you have successfully shut down your laptop and can confidently proceed with removing the hard drive.
How to Detach the Hard Drive of Your Laptop Safely: A Detailed Procedure
Instances may arise when you may need to disassemble your laptop’s hard drive. It may be due to a need for upgrades, the hard drive is failing, or you simply want to replace it with a more superior one. Whatever the case, it is crucial to handle this sensitive piece of equipment with care to avoid damaging your laptop or personal injury. The process looks complicated, but with the right tools and steps, you can safely remove your hard drive. This guide provides you with a step-by-step method to safely dismantle your laptop’s hard disk drive.
Exercise Caution!
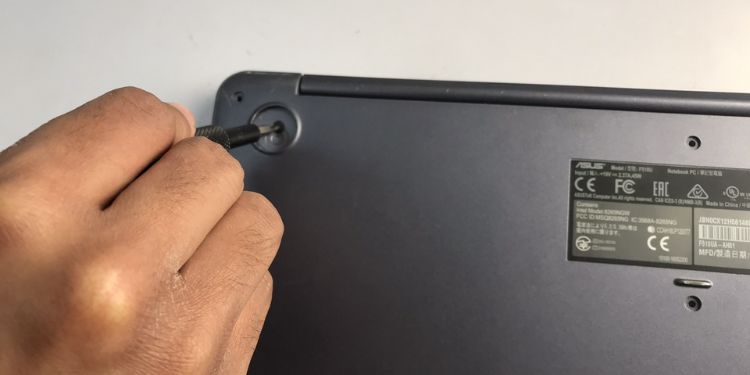
Before engaging in this task, make sure your work surface is clean and you have the necessary screwdrivers handy. Remember always to ground yourself to avoid static electricity harming the internal components. Also, ensure the laptop is switched off, unplugged, and the battery removed where possible.
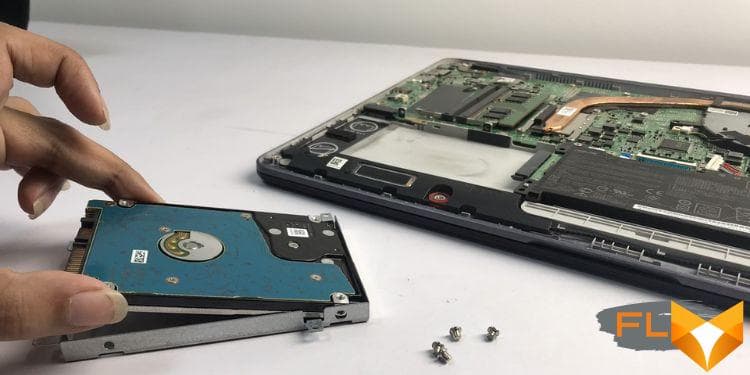
- Removing the laptop cover: Locate the hard drive’s compartment, often signified with a cylindrical logo. Using a suitable screwdriver, unscrew the panel that shields the hard drive. This should give you access to your hard drive. Keep the screws in a safe place to avoid misplacement.
- Disconnecting the hard drive: Slowly and carefully detach any cables connected to the hard drive. In some laptops, the hard drive is affixed with screws. If so, unscrew them carefully and keep them safe. Once loose, pull out the hard drive.
- Removing the hard drive from its caddy: Most laptop hard drives are held in a metal or plastic caddy for extra security. To unscrew the hard drive from the caddy, look for screws at the sides or bottom of the caddy and carefully unscrew them. Once the screws are off, slide out the hard drive from its caddy.
With the hard drive securely out, you can now replace it or upgrade it as needed. Remember that when dismantling electronic devices, patience, precision, and care are the best tools in your arsenal to avoid any mishaps.
How to Locate and Carefully Extract the Hard Drive from Your Portable Computer
When you want to dismantle your portable computer’s hard drive, pinpointing its exact location and cautiously taking it out are essential steps. Before starting, remember safety comes first. Ensure your computer is turned off and unplugged from any power source. Non-anti-static tools should also be avoided as they might cause damage to your device.
Identifying Your Laptop’s Hard Drive
The initial step is to ascertain where your laptop’s hard drive is located. This varies with different types of laptops. Normally, the hard drive bay is situated on the bottom of the portable computer and can be identified by a small rectangular panel held in place with screws. To help identify this, consider reviewing your device’s manual or looking for the hard drive symbol on the laptop itself.
Extracting the Hard Drive from Your Computer
Once the hard drive location is identified, we move to the extraction process. Using a screwdriver, remove the screws holding the hard drive latch in place. When pulling out the hard drive, ensure you do so in a motion opposite to the connector inside to prevent any damage. Hold the sides and lift it up gently. Once removed, place it on a non-static surface. Avoid touching the underbelly of the drive as this can create static that could harm the sensitive electronic components.
In conclusion, the process of locating and extracting a hard drive from a laptop requires a keen eye and precision. Remember to consult your device’s manual and always take precautionary measures while performing such tasks to avoid any unintentional damage.
Safe Practices for Safeguarding Your Laptop’s Hard Drive
Handling the hard drive of your personal computer is a delicate process that necessitates precision and safety measures. To ensure an unproblematic removal, it is critical to understand and abide by certain guidelines when it comes to interacting with the hard drive of your laptop. Following these do’s and don’ts will make sure you maintain the integrity of your device, and have a seamless experience throughout the process.
Dos When Handling Your Laptop’s Hard Drive
- Use Anti-static Solutions: The use of anti-static solutions or wristbands can help reduce the chances of static electricity damaging the hard drive. Static electricity can be a silent destroyer to your hard drive’s electronic components.
- Power Down Completely: Make sure your laptop is completely turned off. Unplug the power cord and remove the battery to ensure no electrical current is flowing through the system when you are handling the hard drive.
- Handle with Care: When removing or installing the hard drive, be gentle. Hard drives are sensitive equipment and require delicate handling.
Don’ts When Dealing with Your Laptop’s Hard Drive
- Don’t Touch the Circuit: Avoid touching the green circuit board or the connectors. These elements are highly sensitive and can be easily damaged.
- Don’t Use Excessive Force: If the hard drive does not easily slide out or fit in, do not force it. Forcing the hard drive can cause damage to its components or its slot in the laptop.
- Don’t Disassemble: Never attempt to disassemble the hard drive itself. It contains sensitive components and its internals are calibrated at the factory. Any disturbance could lead to potential data loss.
In conclusion, proper handling of your laptop’s hard drive is crucial to maintain its optimum performance and avoid potential data loss. Take heed of the guidelines outlined here and your device will thank you for it!
Course of Action After Detaching the Laptop’s Hard Drive
Once you have successfully dislodged your laptop’s hard storage device, there are several steps you need to follow to ensure that the whole process is safe and effective. The subsequent course of action to follow depends on your purpose of disconnecting the storage unit in the first place.
The Safe Storage of the Hard Drive
The first step is proper and safe storage. An exposed disk drive is susceptible to damage from static electricity discharge. Therefore, it’s essential to store the disk drive in an anti-static bag to protect it from dust and static discharges.
If you plan to reuse the hard disk at a later point, or perhaps you’ve removed it to protect sensitive data before repairing or discarding your computer, it’s crucial to store it properly. High humidity levels or severe temperature changes can cause detrimental damage, therefore, select a storage condition that is dry and has minimum temperature fluctuations.
Data Transfer
If you’re planning to upgrade to a new hard disk or switch to a solid-state drive (SSD), it’s vital to transfer all your data correctly. For this task, a disk cloning tool will be extremely useful. It will allow you to create an exact copy of the contents of your hard disk to move to your new storage facility.
- Ensure the new hard disk or SSD is connected to your system.
- This can be done using an external USB hard drive connector, which is a pocket-friendly device designed to make a SATA hard disk behave like an external storage device connected via USB.
- Use a disk cloning software.
- There is a plethora of such software available online for free, as well as premium versions that offer more sophisticated features.
Once completed, your system is ready to have the new hard disk or SSD installed, safe in the knowledge that your data has been secured.
Steps to Follow Once the Hard Disk has been Detached from Your Portable Computer
After successfully disengaging the hard disk from your portable computer, the next crucial step is to reassemble your PC. This step is just as crucial, and a slight mistake can result in a malfunctioning device. Consequently, it is critical to follow a systematic, step-by-step approach to ensure proper reassembling.
Reassembling Steps
First and foremost, replace the hard drive or SSD with a new one, if you planned to. Slide it into the bay from which you removed the old one and secure it using the same screws you previously set aside.
Next, if the hard drive was confined within a cage, return the cage to its original spot and fasten it. Ensure all the screws are placed and tightened exactly where they were initially. This is important as different screws may have different sizes and could damage the threads in the holes if mixed up.
Once the new hard drive or SSD is secured in position, reattach the cover. Align the cover in the right position and push down gently until all the clips are locked in place.
In some PC models, you might need to screw the cover back on the laptop. If this is your case, replace and tighten any screws that you initially removed to access the hard drive. Ensure you put them back in the correct order.
Lastly, connect the laptop to power and turn it on. Check to ensure that the PC operates correctly. Remember to set up the new hard drive or SSD in your system BIOS if necessary.
Reassembling Tips:
- Work in a clean, well-lit environment to avoid losing any screws or components.
- Take your time. Rushing the process can result in a faulty reassembly.
- If you’re uncertain, refer back to your device’s owners manual or seek professional help.
Note: You should also make sure that you don’t have any extra screws when you finish. If you do, it could mean you missed a step, or forgot to screw a part back in. This could potentially lead to problems down the line, so it’s essential to double-check everything.
Addressing Frequent Issues After Detaching a Laptop’s Storage Device
From time to time, issues may arise after unwiring your laptop’s storage medium. These complications can range from minor inconveniences to major problems that require professional assistance. Here are some common scenarios you may encounter and methods for troubleshooting them:
1. Laptop fails to start after the storage device removal:
When you disconnect the hard disk from your laptop, it is crucial to ensure that all other components remain intact and undamaged. If your laptop doesn’t start up, it may indicate issues with the power supply, motherboard, or other core components. Try attaching an external storage medium, if the laptop still doesn’t start, it’s best to consult with a professional technician.
2. Data Loss:
Data loss is one of the most significant problems faced after removing the storage device. It’s essential to back up all critical files before detaching the drive. Post-removal, if you can’t find certain files, try utilizing a data recovery tool. However, successful recovery isn’t guaranteed, showcasing the significance of a prior backup.
3. Laptop behaves erratically:
If the laptop functions abnormally after the drive’s removal, there’s a chance you might have damaged another component during the process. A complete hardware check is advised in such cases. Ensure to inspect the RAM, power supply, and other cables for any visible damage.
4. Operating System not booting:
The Operating system might fail to boot if your laptop was using the detached drive as the system disk. It’s vital to ensure that the OS was installed on the remaining drive before detaching.
Tips for Avoiding Problems After Removing Your Laptop’s Storage Medium
Most issues faced post the detachment process stem from rushing or neglecting to plan properly. Follow proper guidelines, take your time, and prepare for the task at hand to ensure a smooth process. Always remember to back up your data and verify your operating system’s location. It will help in averting the majority of these issues post-removal.
FAQ How to remove hard drive from laptop:
Why won’t my computer start after I removed the hard drive?
You might have accidentally disturbed some other parts of the computer while removing or replacing the hard drive. Check the connections to the motherboard, especially the ones leading to the power supply. If your computer still doesn’t start, it could be a sign of a more serious hardware problem.
I removed a hard drive from my computer but it is not recognized when I connect it to another one, what could be the reason?
If your hard drive isn’t recognized, it is possible that the disk is not formatted correctly, or the disk may have become corrupted. You can use disk management software to check the status of the hard drive. Please ensure you have installed the necessary drivers for the hard drive as well.
Why is my laptop significantly slower after swapping out the hard drive?
The speed of a computer can be affected by the specs of your new hard drive. Also, ensure that the hard drive is properly installed and setup. Misconfiguration can lead to slow performance. Check if your laptop’s drivers are up-to-date as outdated drivers may also decrease performance.
Why is my computer not detecting the hard drive I just added?
The most common cause of this problem is a misconnection. Check to ensure that all cables are securely connected. Also, the drive may not be formatted properly or the drive itself might be damaged. Try connecting the drive to another slot or use a different SATA cable.
I cant access the data on my old hard drive after removing, what should I do?
First, ensure one more time that the hard drive is properly connected to the new system. If it’s not recognized, use disk management tools to detect and assign a drive letter to the hard drive. If it still won’t open, the data could be corrupted or the hard drive may be physically damaged.
Why do I get a blue screen error after installing a new hard drive?
Blue screen errors are usually related to hardware or driver issues. The new drive might be faulty or incompatible with your system. Also, double-check the connections to the motherboard. If you have recently installed any new software or drivers, they might be causing the problem as well.
Most Popular Articles

ASUS ROG STRIX SCAR 17 gaming laptop review: hey desktop, move over!
Overview of the laptop Huawei MateBook D16 (RLEF-X) on the i7-12700H processor
Amd and Intel Core Best CPU for rtx 4090 in 2024 Nvidia Geforce Rtx 4090
Acer Nitro 5 AN515-54-56MH Gaming Laptop Review: Just Add Memory

4 Best Kvm Switches for Gaming Setup Hdmi Gaming Pc 8k

Ryzen 9 7950X scores on Geekbench, worse than engineered Core i9-13900K