Step-by-Step Guide: How to Take a Screenshot on a Samsung Laptop
Step-by-Step Guide: How to Take a Screenshot on a Samsung Laptop
Contents
show
Be it for work, educational materials, or troubleshooting technical issues, capturing screen images or screenshots on your Samsung Notebook has become an essential skill in the digital era. However, many people still find themselves stumped when it comes to taking a screenshot on their laptops, particularly if they’re using a distinct brand like Samsung. Whether it’s for saving precious memories from a video chat, illustrating a software bug, or keeping a record of various things, this guide provides a detailed step-by-step process to assist you.
Screenshots are more than just capturing an image; they also make it possible for you to save, share and use this information at a later date. They can be used to record valuable steps, illustrate a point, report issues, and share your screen’s exact view with others. Samsung laptops, like any other machine, come equipped with internal screenshot capabilities. Learning how to capture these images will save you time and effort, and make your digital experience that much smoother.
In this article, we aim to simplify the process of taking screenshots on your Samsung laptop. We will guide you through each step, ensuring that you understand exactly what to do and when to do it. This procedure doesn’t require any special tech skills or knowledge and can be easily performed by anybody with a basic understanding of how to use a laptop.
So, sit back, relax, and follow us through this comprehensive tutorial to capture screen images on your Samsung Notebook.
Unraveling the Idea Behind Screenshots
In today’s world where digital communication has become the norm, capturing information available on your screen could occasionally be essential. This is where the idea of a screenshot comes in.
A screenshot, also called a screen capture or screen grab, refers to a digital image that depicts the contents of a computer screen. It’s akin to taking a photograph of whatever is displayed on the screen at a particular moment. This could range from a fascinating image, crucial project details, an error message, or any information that needs to be shared or retained for future reference.
Why Screenshots are Useful
The effectiveness of screenshots is founded on their potential to convey data exactly as it appears on your screen. This is particularly useful in scenarios where copying and pasting a piece of information might omit its visual context or formatting.
Also, screenshots are instrumental in the following ways:
- Documentation: They help keep a visual record of important information that may not be possible to save in other formats.
- Instructions: If you are trying to explain a process or teach someone how to perform a particular task on their computer, screenshots can help you visually and precisely illustrate the process.
- Troubleshooting: In case of technical glitches, a screenshot of the problematic occurrence can aid in identifying and solving the issue.
In essence, understanding screenshots in today’s digital age is not a choice but a necessity. Screenshots are easy to capture, provided one knows how to take one on their device, such as a Samsung laptop. Once taken, they can be stored, shared, or even edited depending on the user’s intentions.
Initial Steps: Getting Your Samsung Laptop Ready for Screen Capture
Before you can successfully capture a screenshot on your Samsung laptop, there are a handful of important preliminary steps you need to take. Ensuring that you’re properly prepared will make the process run much more smoothly.
Check Your Laptop’s Operating System
Firstly, it’s important to check which operating system your laptop is currently using. The process for capturing a screenshot may vary slightly depending on whether you’re using Windows 10, Windows 8, or an earlier version of Windows.
Open The Screen You Want to Capture
Next, navigate to the screen that you want to capture. This might be a webpage, a document, or even a software application. Once you’ve opened the right screen, make sure everything you want to capture is fully visible.
Ensure Your Keyboard is in Working Order
Capturing a screenshot on a Samsung laptop typically involves using certain keyboard shortcuts. For this reason, make sure your keyboard is in proper working order before you begin. If certain keys are jammed or unresponsive, you might find it difficult to capture a screenshot.
Remember, taking a screenshot is a very useful skill that can potentially save you a lot of time and trouble. Whether you’re trying to resolve a software problem or simply capture something funny to share with friends, knowing how to take a screenshot is handy. But before you get started, make sure you’ve taken these preliminary steps to prepare your Samsung laptop for a screen capture.
Procedure 1: Capturing the Entire Screen with Shortcut Keys on a Samsung Laptop
One of the quickest and most straightforward methods of capturing a screenshot on a Samsung laptop is to use the keyboard shortcuts. Here is a step-by-step guide to achieving this:
Step 1: Open the Screen You Want to Capture
Firstly, open and properly set up the window or application that you want to capture. Make sure everything you want to appear in your screenshot is visible.
Step 2: Identify the Necessary Keys

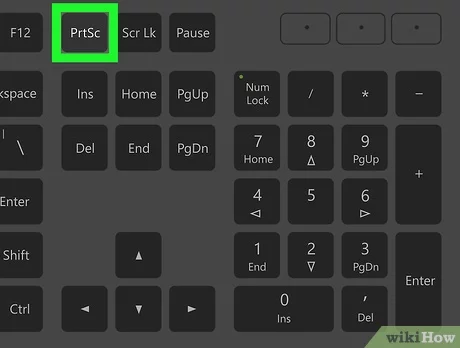
Once your screen is ready, locate the required keyboard keys. For most Samsung laptops, that would be the Fn or Function key and the PrtScn or Print Screen key. They are typically located at the bottom left and top right corners of the keyboard, respectively.
Step 3: Capture the Screenshot
Now, hold down the Fn key and, while still pressing it, click the PrtScn button. This command will take a screenshot of your entire screen.
Step 4: Locate and Open the Screenshot
After capturing, the screenshot is automatically saved to your clipboard. You can paste (ctrl + V) it into any suitable program like Paint or Word. Alternatively, if you want to view it immediately, you can open any folder, click on This PC in the left sidebar and then double-click on the Pictures folder. Inside this folder, locate and open the Screenshots subfolder where your freshly made screenshot resides.
Using keyboard shortcuts to take a screenshot on your Samsung laptop is both easy and convenient. It allows you to quickly capture and save any important information on your screen with just a couple of key presses.
Next Approach: Snapshotting Selected Sections on a Samsung Laptop with Snipping Tool
In addition to the previous method, there is another convenient tool already installed on your Samsung laptop which allows you to capture selected sections of the screen. This tool is aptly named Snipping Tool. The steps below will guide you on how to utilize this tool for capturing part of your screen:
- Go to the ‘Start’ menu located at the bottom left corner of your screen.
- Type ‘Snipping Tool’ into the search bar and hit ‘Enter’.
- Select the ‘Snipping Tool’ application from the provided list to open it.
- Once opened, click on the ‘New’ button to start a new selection.
- Your screen will appear foggy allowing you to select the area you want to capture. Drag the mouse cursor around the area you want to take a snapshot of.
- Release the selection to capture the screenshot. The snip will then open in the Snipping Tool window.
- You can then save, copy, or share the snip directly from the Snipping Tool.
Remember: The Snipping Tool also offers various modes like ‘Rectangular Snip’, ‘Free-form Snip’, ‘Window Snip’, and ‘Full-screen Snip’. You can choose the one that best suits your needs from the ‘Mode’ dropdown before you click ‘New’.
Note: The Snipping Tool might soon be replaced by ‘Snip & Sketch’ on Windows. So, don’t worry if you do not find the Snipping Tool on your Samsung laptop. The ‘Snip & Sketch’ functions similarly and even offers more features like annotating on the screenshots.
Capturing an Image on Your Samsung Laptop Screen Using the Print Screen Button
The Print Screen button allows you to take a screenshot on your Samsung laptop effortlessly. This button is usually abbreviated as PrtSc on most keyboards.
Steps to Use Print Screen for Capturing Screenshot
- Locate the Print Screen button on your keyboard. It’s typically found on the top row of the keyboard, near the function keys.
- Open the page, document, or image you want to capture. Make sure it’s fully visible on your screen.
- Press the Print Screen button. Your screen will look as if nothing happened, but a screenshot of your entire screen has been taken and copied to your clipboard.
- Now, Open an image-editing software or word processor. Paste the screenshot by pressing Ctrl + V or selecting paste from the right-click menu.
- Save the screenshot on your Samsung laptop. Make sure to choose a location where you can easily find the image later.
Note: If you only want to capture an active window instead of the entire screen, press Alt + PrtSc. You can then paste the captured image into your preferred image editor or word processor as mentioned in Step 4. This can save you time from cropping unnecessary parts later on.
Remember: The Print Screen method is a simple and quick way of capturing screenshots on a Samsung laptop. Although it doesn’t offer a lot of options, it’s perfect for instances where you need a fast screenshot of your entire screen or an active window.
Progressive Methods: Capturing Scrollable Content on Your Samsung Notebook
Beyond standard screenshots, capturing scrollable content on your Samsung notebook is an advanced method you might find helpful. This feature is often referred to as the scroll capture or scroll screenshot. Below is a step-by-step process on how to go about it.
Using a Built-in Tool or Software
One of the easiest ways to take scrolling screenshots on your Samsung laptop is by employing built-in tools or third-party software, such as Snagit. Here’s the process:
- Open the window from which you want to take a scrollable screenshot.
- Launch the Snagit application.
- Click on the Capture button.
- Select the area you wish to capture or select the entire scrolling window.
- Click on the Scrolling Window option.
- Once you have the screenshot, save it in your preferred location on your laptop.
Please note: Some features, like scroll capture, might not be available on all Samsung notebooks, as it often depends on the model and the software version.
Capturing Scrolling Screenshots without Third-Party Software
Although built-in features and software can simplify the process, it is possible to capture scrollable content without third-party tools. Here’s a simple method:
- Open the content you want to capture.
- Press PrtScn on your keyboard to capture the visible area.
- Scroll down to show more content and press PrtScn again.
- Open a graphics editor (like Paint) and paste the first image.
- Paste the second image underneath the first one in the editor, then crop if necessary.
- Save the final image as a new file.
Remember: This manual method may require some time and effort, especially if the scrollable content is lengthy.
Preserving Your Captured Image: Techniques for Safeguarding and Labeling Your Screenshot on a Samsung Laptop
After successfully capturing a screenshot on your Samsung laptop, it’s essential to protect and uniquely identify it for easy retrieval in the future. Let’s explore these key processes closely.
Maintaining Your Captured Display: Saving The Screenshot
The first and the most critical step is saving your captured screen. Once you’ve taken the screenshot, it’s temporarily stored on your clipboard. To safeguard it from being overwritten by new clipboard data, you must immediately transfer it to a more permanent location on your Samsung Laptop.
You can accomplish this task by opening any image editing tool or word processor, and then using the paste function (Ctrl+V). Afterward, navigate to ‘File’, and then select ‘Save’. You should choose a suitable location on your hard disk where you’ll have no difficulties accessing the screenshot in the future.
Identifying Your Captured Display: Naming The Screenshot
A crucial yet overlooked aspect of managing screenshots effectively is embracing a clear naming scheme. By assigning each screenshot a unique and descriptive name, you eliminate the hassle of sifting through numerous unnamed images.
When saving your screenshot, in the name field, try to incorporate relevant details about the screenshots content, the date of capture, or anything else that enhances its descriptiveness. Remember to keep it concise. For example, a screenshot of a competitor’s webpage taken on June 5, 2023, could be named ‘CompetitorWebpage_050623’.
In conclusion, effectively saving and naming your screenshots not only protects them from loss, but also aids in their convenient and quick retrieval when necessary.
Modifying Captured Images: User-friendly Utilities for a Samsung Laptop
After effectively capturing shots of your Samsung laptop screen using the method we previously discussed, you may want to personalize these images for various purposes. Fortunately, Samsung laptops inherently come with simple to utilize utilities which can significantly ease the process.
Snipping Tool
This powerful yet easy-to-use utility is a staple in most Samsung laptops. The Snipping Tool does not only capture parts or the entire screen efficiently but also allows for basic modifications right after. Users have the full liberties to add scribbles, lines, and highlights to any snapshot. To use this function, just click on the pen or highlighter icon, pick a color you prefer, and apply it to the areas you want to emphasize.
Microsoft Paint
Another widely accessible utility in Samsung laptops is Microsoft Paint. Alongside capturing screen images, this software broadens the range for possible edits. You can crop parts of the image, resize it, or switch its orientation. To add even more personalized touches, you can use Paint’s text, shapes, and lines tools.
Remember: When you save an edited screenshot in Paint, ensure to use formats like the .PNG or .JPEG for high-quality results.
Inherent Edit Functions
Every screenshot taken on a Samsung laptop can be directly modified using the inherent edit functions. Immediately after capturing a shot, click on the image and look out for edit tools such as crop, draw, or add text which are typically found at the top of the image. Select any tool and apply the changes as per your needs.
Note: You can always undo an edit if you made a mistake or simply want to retry.
Samsung laptops, thus, provide multiple user-friendly utilities to personalize your screenshots with ease. Understanding these tools and their capabilities can immensely help to improve your overall productivity.
Options and Platforms for Disseminating Screenshots
After capturing a screenshot on your Samsung laptop, you might need to disseminate it to other people. Thankfully, in this digital age, there are numerous ways you can circulate a snapshot across various platforms.
Direct Transfer Method
A basic method is through direct transfer. This can be via email attachments or instant messaging apps like Messenger or WhatsApp where you simply attach the capture and send. USB drives can also be handy if you’re sharing the screenshots physically.
Cloud Services
Cloud storage platforms like Google Drive, Dropbox, and OneDrive offer ways of circulating screenshots captured on your Samsung laptop. Consider uploading the snapshot to one of these platforms and share the link or give access to specific individuals. An added benefit for this approach is that it allows you to access these screenshots from any device, anywhere, anytime.
Social Media Platforms
Another great way to disperse these captures would be via social media platforms. You can post screenshots on Facebook, tweet them on Twitter, or share via LinkedIn depending on your needs. Instagram is also a useful platform, especially if you’d like to add filters or other aesthetic details onto your screenshot.
Note that regardless of the method you opt for, it’s essential to respect other people’s privacy and consent before sharing a screenshot, especially if it contains sensitive or personal information.
Overall, there are many channels available for sharing screenshots from a Samsung laptop. The choice depends on your specific needs, convenience, and the nature of the content in the screenshot.
Considerations When Capturing a Screen Image on a Samsung Computer
Screen capturing on a Samsung laptop can be an invaluable tool for sharing important information, documenting problems for tech support, or simply preserving a memorable moment on your screen. While the process is straightforward, keeping a few important tips in mind will ensure you successfully capture exactly what you intended.
Check Your Timing

Its important to be mindful of the timing when taking a screen capture. If you have multiple windows open or notifications are popping up, they may end up in your screenshot as well. Make sure to close any unnecessary tabs, silence notifications, and wait for the perfect moment to take your screen capture.
Understand Your Options
Knowing the different methods to capture a screen image may come in handy, depending on the specific needs. Samsung laptops typically include traditional shortcuts for full screen captures (such as PrtScn button) but also offer additional options, like capturing a single active window or a specific portion of your screen. Explore these options and understand how they can serve you best.
Preserve the Quality
Maintaining the original quality of the image is crucial to effectively communicate the information from your screen to others. Make sure to save your screen capture in a format that doesn’t compromises the quality of the image, such as PNG.
These guidelines might clarify the process of capturing a screen image and help identifying the most efficient ways to do so. Remember, practice makes perfect, dont hesitate to take several screenshots until you get the perfect one.
Troubleshooting Tips for Frequent Issues When Capturing Screenshots on your Samsung Notebook
It is a common experience to face some challenges while trying to capture screenshots on your Samsung notebook. Let’s unravel some of the recurrent problems and shead light on their respective solutions.
1. Inability to Capture Screenshot
One of the common problems that you might encounter is the inability to take a screenshot. This can happen due to several reasons. You might be pressing the wrong keys, or there might be an issue with your keyboard settings.
- Solution: Ensure that you are pressing the right keys to capture the screenshot. The keys can vary based on the model of your Samsung notebook. If the issue persists, check the configuration settings of your keyboard. It might be that the function keys are not configured correctly.
2. Screenshot Quality is Poor
If the quality of your screenshot is not up to the mark, this could be due to the screen resolution settings of your laptop.
- Solution: Adjust the screen resolution of your Samsung notebook. The higher the resolution, the better the quality of the screenshot. However, keep in mind that the file size of the screenshot will also increase with the resolution.
3. Screenshot not Saving
A widespread issue is the screenshot not saving in the designated location or not saving at all after capture.
- Solution: This might occur if the default saving location for screenshots is not set right. To correct it, go to the screenshot settings and set a proper location. Another reason for this could be a shortage of storage space on your laptop. Make sure you have ample space on your laptop for saving the screenshot.
4. The Screenshot is Capturing the Wrong Area
At times, you might find that your screenshot is capturing the wrong area of the screen, not the one you intended.
- Solution: This might occur if you’re not choosing the capture area correctly. Make sure to select the correct area of the screen that you want to capture. Some Samsung notebooks also offer the functionality to capture a specific area, a window or the full screen; ensure you have selected the right option.
It’s important to remember that troubles are just mere obstructions. They can be easily knocked out with a little bit of know-how. Try out these solutions to make the best out of your screenshot capturing experience on your Samsung notebook.
FAQ How to screenshot on samsung laptop:
Why won’t my computer take a screenshot?
You may actualize this issue for several reasons including running software that blocks the screenshot feature, certain system failures, or not using the correct screenshot key combination. Try to restart your computer and if the issue persists, check the key combination or settings related to screenshots.
Why is my screenshot not working on my iPhone?
If you cannot take screenshots on your iPhone, it could be due to a number of reasons. It could be a system malfunction, or your iPhone might be running a problematic iOS version. You could try a hard reset or update your iPhone to the latest iOS version. If the error persists, you might need to check your button functionality or consult with Apple Support.
I press the Print Screen key, but where is my screenshot saved?
When you press the Print Screen button, the image is actually copied to your clipboard. It is not automatically saved as a file. To save the screenshot as a file, you can open a program like Paint or any image editing software, then paste and save it from there.
Why can’t I take screenshots in secure apps or private browsing modes?
Some apps and sites have a security policy that prohibits screenshots in order to protect sensitive data. For example, many banking apps and payment apps will restrict screenshots. Similarly, private browsing modes often block screenshot functionality for privacy reasons. This is not an error, but part of the design of these secure systems.
Why do my screenshots look blurry or low quality?
This could be due to a number of reasons including the resolution settings of your computer or phone, resizing of the screenshot, or the app you are using to view the screenshots may not be displaying them in full quality. Be sure to check the size and resolution of your screenshots and view them in an app that supports high-quality images.
Why can’t I see the mouse pointer in my screenshots?
By default, many systems do not include the mouse cursor in screenshots. This is because it provides a cleaner image. If you want to include the cursor in your screenshots, you will need to use a third-party screenshot application or tool that includes this feature.
Most Popular Articles
Downgrade Ios 16 Without Losing Data – Downgrade From Ios 17 to Ios 16
Intel Core i7-12700K review revealing that E-cores vs P-cores, but without them, everything is only worse

The 2022 Ultimate Guide to Z370 gaming Motherboard: Exploring Features, Performance and Top Choices
HP Envy 13 (2021) review
Review of laptop-transformer HP Envy x360 13

ASUS ZenBook Pro Duo 15 OLED UX582L laptop review: guest from the future