
Step-by-Step Guide: How to Hard Factory Reset Lenovo Laptop Without Password Step-by-Step Guide: How to Hard Factory Reset Lenovo Laptop Without Password
Contents show
Hassle with laptop and system issues is an inevitable encounter for most computer users. One moment, everything seems to be functioning well, and the next, you’re fighting with slow performance, unresponsive applications, or virus threats. Knowing how to perform a factory reset can be a lifesaver and a useful skill that all Lenovo laptop owners should know.
This article provides a detailed, easy-to-follow method on restoring Lenovo laptops to their original factory settings, a.k.a. a hard reset. This process should ideally eliminate any software-based problems that you’ve been experiencing with the system. However, it’s worth remembering that a hard reset should be considered a last option, as this procedure will remove everything stored in the laptop.
Whether you are planning to sell your Lenovo laptop, want to counter a stubborn virus, or are dealing with major system issues, our comprehensive guide will help you navigate through the steps required for a Lenovo laptop hard reset effectively and confidently. Rest assured, whether you’re a tech pro or a beginner, this guide has got you covered.
Understanding the Need for a Hard Reset on the Laptop
Occasionally, laptops reach a point where they can’t perform optimally due to system errors, malfunctioning applications, or the accumulation of too many unnecessary files and applications. In these situations, considering a hard reset, also known as master reset or factory reset, might be the way to go. This process wipes away data and brings the computer back to its original settings, giving it a fresh start. It is often a last resort when dealing with chronic system problems.
Reasons for Initiating a Hard Reset
- Software Issues: Laptops often slow down or crash due to software issues. This could be due to bugs, incompatible software, or corrupt files. A hard reset can resolve these types of issues.
- Virus Infections: Despite using antivirus software, some laptops still get infected with viruses that may seriously harm systems. Factory resetting the device can get rid of these malicious applications and files, restoring the laptops health.
- Performance Improvement: Overstuffed hard drives or too many applications running at once can decrease the overall performance of the laptop. A hard reset clears unnecessary files and application installations, offering better laptop performance.
Before deciding on this measure, it is crucial to remember that the process will erase all existing data. Therefore, it is essential to back up any essential data or files that you would not want to lose beforehand. This step-by-step guide on resetting a Lenovo computer to factory settings will walk you through the process.
Essential Steps to Consider Prior to Implementing a Complete System Restore on a Lenovo Laptop
Before launching into a complete system restore, or hard reset, on your Lenovo laptop, it’s paramount that you prepare adequately to prevent any loss of data or device malfunctions. Here are essential steps you must consider before going forward with the process.
Backup All Essential Data
The first, and possibly the most critical step, is to backup all critical data stored on your laptop. A hard reset wipes everything off your laptop storage, so valuable data would be lost if not backed up. This includes but is not limited to documents, music, pictures, videos, and software licenses. You can back up your data on an external storage device or use cloud storage platforms like Google Drive, OneDrive, or Dropbox.
Update All Software
Ensure you have done all the necessary software updates, especially the operating system updates. Sometimes, issues that lead to considering a hard reset could be solved by simply updating your software.
Charge Your Laptop
Before you proceed with executing a hard reset on your Lenovo laptop, make sure that the laptop is fully charged or connected to a power source. Interrupting the hard reset process due to power failure can lead to system errors or even hardware problems.
Take note of your software keys
- If you have software or games that require a unique license or registration key, ensure you have a copy of these keys as they cannot be recovered after a hard reset.
Consult a Professional
If you’re not confident in the process or want to ensure nothing goes wrong, consider seeking assistance from a tech professional. They have the expertise and knowledge to carry out the process smoothly and without risk.
Securing Your Digital Assets Prior to a Complete Lenovo Laptop System Wipe
Performing a forceful system reset on a Lenovo laptop can solve a lot of issues. However, this process deletes all your data and so it is essential to secure your digital files first. Here are some reliable ways to preserve your data before you initiate a thorough cleaning of your laptop’s system.
1. Utilize an External Storage Device
First in our list is the traditional method of backing up files which is through the use of external hard drives, flash drives, or SD cards. Simply connect the storage device to your laptop, copy the files that you want to preserve, and paste them into the device.
2. Leverage Cloud Storage Facilities
If you prefer a more modern way of keeping your files safe, then cloud storage is the best option for you. Google Drive, Dropbox, and OneDrive are just some of the cloud storage facilities you can use. You need to upload your files on these platforms and access them anytime once you have reconfigured your Lenovo laptop.
3. Use a Network Attached Storage (NAS)
For multiple device users, Network Attached Storage or NAS can be immensely helpful. This storage option allows you to save files from several devices in one centralized location, which can be accessed anytime using the network.
4. Backing up on a Different PC
Lastly, if you happen to have another laptop that has abundant available storage, you can transfer your files there for the meantime. Use a reliable transfer cable to connect the two computers. Alternatively, you can also use the Shared Folders function if both PCs are on the same network.
Remember, ensuring the safe backup of your important files will save you from any potential data loss during a hard reset. It’s easier to do a reset if you’re confident that your files are secure somewhere else.
Using OneKey Recovery for Hard Resetting Your Lenovo Laptop
When you encounter serious system issues on your Lenovo laptop, performing a hard reset might be necessary. This can be done with Lenovo’s built-in utility – the OneKey Recovery system.
Instructions: Doing a Hard Reset with Lenovo’s OneKey Recovery
Please note: The following steps may delete all of your data. It is strongly advised to make a backup of all important files before continuing.
- Firstly, save all your work and close any open applications. Now, press the Novo button on your laptop. This can usually be found on the side of the laptop or near the power button.
- In the Novo Button Menu, select System Recovery. Your laptop should then boot into the OneKey Recovery system.
- Within the OneKey Recovery interface, select Restore From Initial Backup.
- A notification will appear, warning you that your data will be lost if you continue. If you have backed up your data and are ready to proceed, select Start.
- Your Lenovo laptop will now initiate the hard reset. Let the laptop perform the reset, and do not interrupt it during this process. Once completed, the laptop will restart on its own.
With these steps, you can easily perform a hard reset on your Lenovo laptop using the OneKey Recovery system. This can be an effective solution for serious system issues, as well as for when your laptop isn’t operating as smoothly as before.
Step-by-Step Guide to Perform a Factory Reset on a Lenovo Laptop through the Recovery Partition
If your Lenovo laptop is experiencing serious issues, or you want to upgrade your device or sell it and need to erase all your personal data, we have the solution for you. In this guide, we walk you through the process of performing a full system reset of your Lenovo notebook using the inbuilt recovery partition. It’s an advanced technique that reinstalls your operating system and removes all files from your hard drive, so make sure to backup important files before proceeding.
Recovery Procedure for Lenovo Laptops
The pre-installed recovery partition (also known as a restore or repair partition) can be used to reset your Lenovo laptop to factory settings without the need for physical recovery media, such as DVDs or USB drives. Here’s the step-by-step guide on how to go about it:
- Fully shutdown your Lenovo laptop. Do not restart, it needs to be completely off.
- Press the Novo Button on the laptop. This button is usually located on the side of the laptop or near the power button and has an inverted arrow symbol on it. If you cant find the Novo Button on your model, consult your laptops manual. The computer turns on and the Novo Button Menu is visible.
- Select System Recovery from the menu using the arrow keys and press Enter.
- The laptop will ask if you want to start the recovery process. Select Yes, and then choose One Key Recovery.
- Select Restore from initial Backup. This will revert your system back to the original factory settings. Keep in mind this will erase all data on your laptop, including files and installed apps.
- The recovery process will then begin. This can take some time, so its important to keep the laptop plugged into the power source.
- After the process, click Reboot to restart your laptop. It should now be in the same state as when you first bought it.
Please remember, this process should only be used as a last resort when all other solutions for fixing problems have been exhausted. With a proper hard drive reset, your Lenovo laptop will be good as new!
The Procedure to Reinstate Lenovo Laptop to Its Original Conditions Using Windows Settings
There are instances when you might need to restore your Lenovo Laptop to its initial configuration. Whether it’s due to a virus, system issues or simply to improve performance, a complete restoration is often beneficial. Here’s the step-by-step procedure on how you can perform a full reset on your Lenovo Laptop using Windows Settings.
Preparing for the Reset
Before you begin the process ensure that your laptop is connected to a power outlet. This is crucial as a reset can take some time and should not be interrupted. Also, set aside plenty of time as this process should not be rushed.
Remember to back up all necessary files to an external storage device or cloud service. This is due to the fact that this process will clear all your personal files, applications, and settings.
The Reset Process
- Start by opening the Windows Settings by clicking on the Windows Icon at the bottom left corner of your screen and then select ‘Settings’.
- Within the Settings menu, select ‘Update and Security’.
- On the left-hand pane, click on ‘Recovery’.
- You’ll see ‘Reset this PC‘ as one of your options. Click on ‘Get started’ underneath.
- A prompt will appear with two options: ‘Keep my files‘ and ‘Remove everything‘. Choose ‘Remove everything’ if you want to restore your laptop back to factory conditions.
- After selecting ‘Remove everything‘, instructions will appear on screen for completing the process. Follow each step precisely to ensure a successful reset.
After the reset process completes, your Lenovo Laptop will be in the same state as when it was originally purchased, free from any user data. Now you can start afresh, restoring the files you need and reinstalling your preferred applications.
Resetting Your Lenovo Laptop to Factory Settings using System Recovery Options
There are times when you may need to restore your Lenovo laptop to its factory settings. This might be due to a major system error, the presence of viruses, or simply the desire to start fresh. Here, we provide a step-by-step guide to performing a hard reset on your Lenovo laptop by utilizing the System Recovery Options.
Initial Steps of Procedure
First and foremost, back up all important data. This is because a hard reset will erase everything on your machine. After ensuring your data is safe, disconnect all peripheral devices like USB drives, mice, and printers.
Next step is to fully charge your laptop or keep it connected to power during this process. This is to prevent your machine from shutting down during the reset process, which could lead to severe system damage.
Proceeding to The System Recovery Option
With that sorted, you’re now ready to initiate the hard reset. Restart your laptop and as it’s booting up, quickly press the ‘Novo’ button (usually next to the power button). This will lead you to the ‘Novo Button Menu’.
From this menu, choose the ‘System Recovery’ option. Then, select the System Restore option from the System Recovery Options panel.
Finishing The Factory Reset
Your system will then prompt you to select your user account and enter your password. Follow the prompts to choose a recovery point (if available), if not, simply proceed.
Finally, confirm your decision to perform the hard reset. The process will begin and may take several minutes to an hour based on your laptop’s specs. Once done, your Lenovo laptop will restart and boot up with its original factory settings.
Remember, a hard reset should be your last course of action as it will wipe your system clean. Always ensure you have exhausted other troubleshooting steps before making this decision.
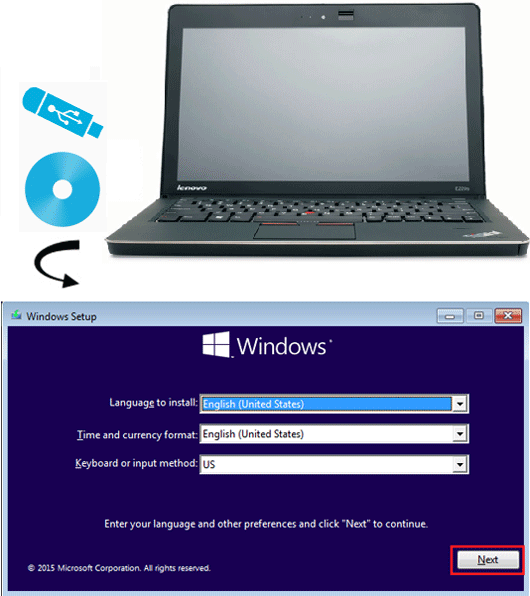
Understanding the Function of Windows Setup Disk in Performing a Deep Cleanup on Your Lenovo Notebook
Conducting a forceful system reinstate on your Lenovo workstation is a significant move to wipe out everything from the system. Its like starting everything from scratch. This process often helps when your laptop behaves erratically or slows down due to enormous data load. Primarily, the utilization of the Windows setup disk plays a crucial role in this process.
Now, why is the Windows setup disk so important? Usually, your Lenovo notebook comes with a default recovery feature that enables you to restore the factory settings. However, in some cases, this recovery partition may not function due to certain system threats like virus or malware attacks. That’s when your Windows setup disk comes to the rescue.
Bootable Windows installation USB or DVD contains all necessary setup files to reinstall the operating system. A hard reset using the installation media ensures a complete cleanup, removing every trace of software glitches and system issues.
How to Use the Install Disk for a Forceful System Reset?
Here are step-by-step procedures on using your Windows installation media:
- Restart your Lenovo laptop and simultaneously press F12 to boot from the installation drive.
- Select your language preferences and click ‘Next’ on the setup screen.
- Choose ‘Install Now’ and then ‘Custom Install’.
- Select the drive where your Windows is installed and click ‘Next’.
- Follow the on-screen prompt to finalizing the fresh installation.
By following these steps, your Lenovo laptop would effectively undergo a hard reset, transforming your system into a clean state just as when you first purchased. Always remember to back up your data before going through this procedure as it erases all existing files and data.
Overcoming Typical Problems That Might Arise While Performing a Full Factory Reset on a Lenovo Laptop
During the process of performing an intensive factory reset on a Lenovo computer, several issues might crop up. Understanding these problems and the solutions for them can be a significant first step in mastering the technique of a complete laptop reset. This guide will address some of the most common problems.
Interruptions During the Reset Process
Interruptions during the restore process are one of the major issues you might face. Sometimes, unexpected interruptions, like power outages or forced shutdowns, happen in the middle of the reset process, leading to incomplete restorations.
To avoid this, ensure your laptop is connected to a power supply during the reset. This way, even if the battery drains out, it will not affect the ongoing process. Also, avoid manually shutting down your laptop unless it’s absolutely necessary.
Issues with Backup Data
Difficulties due to inadequate backup of data is another common issue during a factory reset. Sometimes, you could accidentally delete important data or realize you’ve forgotten to backup some files.
Always double-check your backups and make sure you have saved all important data and files in a secure location before initiating the reset. It’s a good idea to separate your files into different folders and label them accordingly for easy access later on.
Problems with Laptop Recovery Option
Complications arising from the malfunction of the Lenovo laptop recovery option is another potential issue. Sometimes, the recovery option does not function as expected, making it impossible to complete the reset.
Whenever you face such a problem, try restarting your device and press the Novo button (usually located next to the power button on Lenovo laptops) to enter the Novo Button Menu. From there, you can choose the System Recovery option to start the process again.
Alternatively, you can use an antivirus software to scan your system for potential threats and harmful programs. Often, these viruses interfere with your systems recovery options and can be one of the reasons behind its malfunction. Ensure your laptop is fully protected with a reliable antivirus program.
Ways to Keep Your Lenovo Laptop Running Smoothly After a Full Reset
After performing a complete reset on your Lenovo laptop, it’s important to take certain steps and precautions to maintain your machine. This not only improves overall performance, but also helps preserve its lifespan.
Critical Measures to Take Post Reset
Keep your system updated: After a hard reset, the first measure you should take involves ensuring all system components are up-to-date. You can accomplish this by checking for any available updates for the OS, applications, and drivers. Timely updates provide critical bug fixes and performance boosts.
Activate firewall and antivirus software: Cybersecurity should never be an afterthought. After a full laptop reset, you should enable the built-in firewall and install dependable antivirus software. Remember to keep these security measures updated to protect against the latest threats.
Migrate data cautiously: If you’re restoring data after a laptop reset, be mindful about the files you’re transferring. Importing large volumes of unnecessary or obsolete files can quickly clog up your hard drive and affect performance.
- Regularly perform disk clean-ups: Routine disk clean-ups can effectively rid your laptop of unnecessary files and free up valuable storage space.
- Manage your startup programs: Too many applications running at startup can considerably slow down your laptop. Ensure only the necessary programs are set to launch on startup.
- Keep an eye on your laptop’s temperature: Overheating can inflict significant damage on your laptop’s hardware. If your Lenovo machine seems unusually hot, consider using a cooling pad or checking the internal fan.
By following these tips, you can keep your Lenovo laptop running smoothly and efficiently for a long time even after a hard reset.
FAQ How to hard reset lenovo laptop:
How do you perform a factory reset on a Lenovo laptop with Windows 10?
To perform a factory reset on a Lenovo laptop running Windows 10, go to ‘Settings’ > ‘Update & Security’ > ‘Recovery’, and under ‘Reset this PC’, select ‘Get started’. Choose ‘Remove everything’ for a full factory reset.
To reset a Lenovo laptop without the Novo button, boot into the Windows Recovery Environment by restarting your laptop and repeatedly pressing the F11 key, then follow the on-screen instructions to reset.
Is it possible to factory reset a Lenovo laptop and still keep my files?
Yes, during the ‘Reset this PC’ process in Windows 10, you can choose the ‘Keep my files’ option, which will reinstall Windows but keep your personal files intact.
How can I use Lenovo OneKey Recovery to restore my laptop to factory defaults?
To use Lenovo OneKey Recovery, turn off your laptop, press the OneKey Recovery button, select ‘System Recovery’, and follow the on-screen instructions to restore your laptop to factory defaults.
Can I reset my Lenovo laptop Windows 10 if I’ve forgotten my Windows password?
Yes, you can reset your Lenovo laptop Windows 10 even if you’ve forgotten your Windows password by booting into the Windows Recovery Environment and choosing the ‘Reset this PC’ option.
What is the purpose of the ‘clean the drive’ option during a factory reset on a Lenovo laptop Windows 10?
The ‘clean the drive’ option during a factory reset on a Lenovo laptop Windows 10 securely erases all data, making it harder to recover, which is ideal if you’re planning to sell or give away your laptop.
To access the BIOS menu on a Lenovo laptop, restart your laptop and repeatedly press the F1 or F2 key (depending on the model) as it starts up to enter the BIOS setup.
What does ‘remove my files and clean the drive’ do in the reset option for Lenovo laptop Windows 10?
The ‘remove my files and clean the drive’ option in the reset process for a Lenovo laptop Windows 10 will delete all your personal files, apps, and settings, and it will clean the drive to prevent data recovery.
Is it possible to use a recovery disc to reset a Lenovo PC to factory settings?
Yes, you can use a recovery disc to reset a Lenovo PC to factory settings. Insert your Windows installation or recovery disc, boot from it, and follow the on-screen instructions to reset your PC.
What should be done before performing a factory reset on your Lenovo laptop?
Before performing a factory reset on your Lenovo laptop, it’s important to back up any important data to an external drive or cloud storage, as the reset process will erase all data on your laptop.
How can I use the ‘Reset this PC’ feature to factory reset my Lenovo laptop?
To use the ‘Reset this PC’ feature, go to ‘Settings’ > ‘Update & Security’ > ‘Recovery’, click ‘Get started’ under ‘Reset this PC’, choose ‘Remove everything’, and follow the on-screen instructions to factory reset your Lenovo laptop.
For a factory reset on a Lenovo laptop without the Novo button, restart your laptop, press F11 repeatedly to enter the boot menu, select ‘Troubleshoot’, then ‘Reset this PC’, and follow the on-screen instructions.
How do I reset my Lenovo laptop to factory settings if it runs Windows 7?
To reset a Lenovo laptop with Windows 7, restart the laptop, press F8 to enter the Advanced Boot Options menu, select ‘Repair your computer’, and then follow the prompts to perform a factory reset.
What should I do if I need to factory reset my Lenovo laptop but have forgotten the admin password?
If you need to factory reset your Lenovo laptop but have forgotten the admin password, you can use the ‘Reset this PC’ option in the Windows Recovery Environment, which doesn’t require the admin password.
What are the necessary steps to reset a Lenovo laptop using OneKey Recovery software?
To reset a Lenovo laptop using OneKey Recovery software, turn off the laptop, press the Novo button to start OneKey Recovery, select ‘System Recovery’, and follow the on-screen instructions to reset your laptop.
How can I remove all my files and reset my Lenovo laptop to its original state?
To remove all your files and reset your Lenovo laptop, go to ‘Settings’ > ‘Update & Security’ > ‘Recovery’, click ‘Get started’ under ‘Reset this PC’, choose ‘Remove everything’, and follow the prompts to reset to its original state.
Is it possible to perform a password reset on a Lenovo laptop during the factory reset process?
Yes, during the factory reset process on a Lenovo laptop, you can reset the password by choosing the ‘Remove everything’ option, which removes all personal files, including any passwords.
What should I do after the reset is complete on my Lenovo laptop?
After the reset is complete on your Lenovo laptop, click ‘Next’ on the final screen, set up your laptop as if it’s new, including setting a new password, configuring settings, and reinstalling necessary applications.
How can I back up my important files before performing a factory reset on my Lenovo laptop?
Before performing a factory reset, back up your important files by copying them to an external hard drive, USB drive, or uploading them to a cloud storage service to ensure no data loss.
Accessing the boot menu is necessary for performing a factory reset on Lenovo laptops if you are initiating the reset process from outside the Windows system, especially when you cannot boot into Windows normally.
Most Popular Articles

Lenovo ThinkBook 14s Yoga ITL convertible review review

MSI Modern 14 (B11MOU-1226RU) Review: A Reasonable Minimum

Apple TV Remote Not Working? Troubleshoot and Fix the Issue

ASUS ZenBook Duo 14 UX482 Laptop with Intel Core, SSD, and Celestial Blue Design

ASUS ROG Zephyrus M16 GU603HR gaming laptop review: see more

A Comprehensive Guide to Force Shutting Down a Dell Laptop: Troubleshooting Tips