
Step-by-Step Guide: How to Split Screen on Dell Laptop Step-by-Step Guide: How to Split Screen on Dell Laptop
Contents show
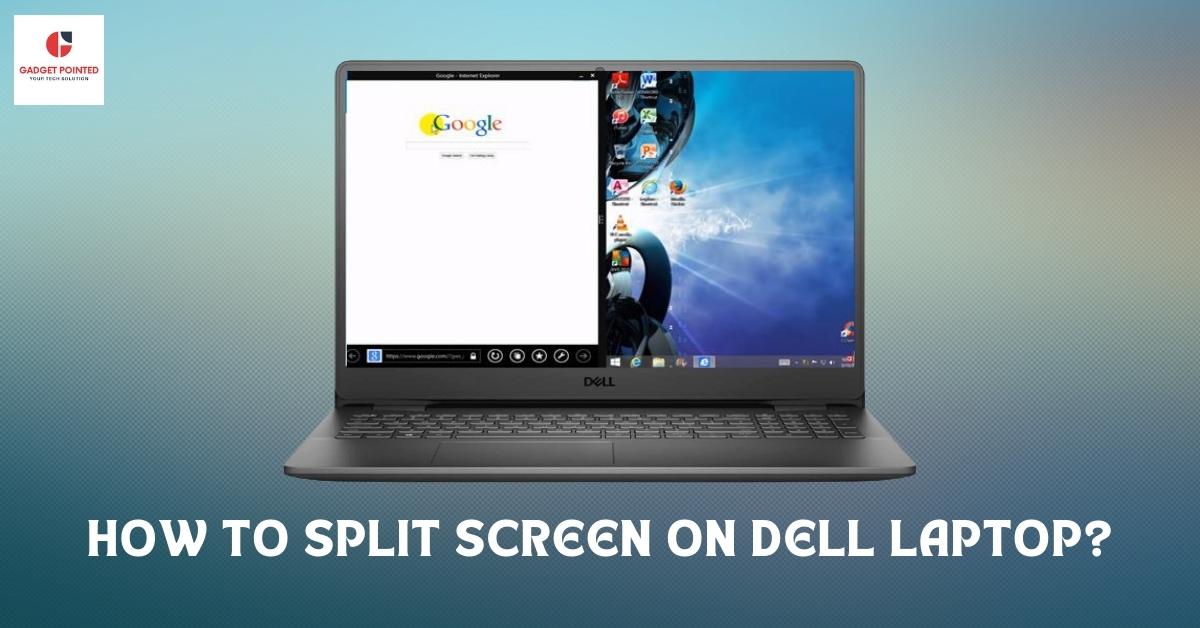
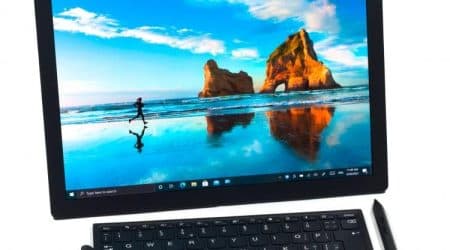
With the advent of personal computers, multitasking has become significantly easier. Working on several tasks simultaneously, whether they are work-related or for personal use, is now possible. One of the features that has made this possible is the split screen functionality. This integral facility allows multiple applications to run and be viewed independently, simultaneously, enhancing productivity.
Dell laptops, being a popular choice among working professionals and students, have incorporated this split screen feature for a more user-friendly and efficient experience. Navigating between applications becomes effortless, with each running application having its dedicated portion of the screen. Therefore, this article aims to provide a detailed, stepwise guide on how to implement this useful feature on any Dell laptop.
We will break down this guide into simple, easy-to-follow steps to ensure even a beginner can comfortably and successfully utilize the split screen feature. You will not only be provided with a method on splitting your screen but also ways to adjust, customize, and troubleshoot the function, ensuring seamless multitasking. Thus, enabling you to make full use of your Dell laptop’s potential and boosting your overall productivity.
Understanding the Division of Screen Feature on Laptops by Dell
The capability to divide your laptop screen is a useful function provided by Dell computers. This functionality enables individuals to work on multiple apps or windows at the same time, increasing productivity and enhancing multi-tasking efficiency. Whether its for professional use or personal, this feature brings comfort and convenience to the user experience.
The division of screen capacity works best with wider screens, providing better visibility and working space for various applications. Dells wide array of powerful laptops equipped with high-resolution displays indeed offer exceptional platform for such feature implementation.
Mechanism of Dells Screen Division Function
For Dell laptops, the mechanism of the division of screen feature is quite straightforward. By either dragging the window to one side of the screen or via specific keyboard shortcuts, the software program or window simply adapts to cover half of the screen while another window can be opened on the remaining half.
If the user requires more than two windows at a time, the screen can relatively be partitioned into multiple sections depending on the size and resolution of the screen, ensuring hassle-free navigation between tasks.
Note: The keyboard shortcuts might vary slightly between different models of Dell laptops and according to the installed operating system. Moreover, not all applications support the screen split feature, especially older versions, which the user might want to take into account.
- You can initiate dividing the screen by simply dragging a desired window to the left or right side until the cursor reaches the edge.
- Upon doing so, the window will adapt to cover half of the screen, allowing you to open another window or application on the remaining half.
- Another approach is to use the keyboard shortcut. Pressing the ‘Windows’ key along with the left or right ‘arrow’ key can guide the active window to cover half of the screen.
Essentially, the split screen function on Dell laptops is a valuable tool that streamlines operations and boosts productivity, facilitating a comprehensive workspace for professionals and tech enthusiasts alike.
Mastering Shortcut Keys For Utilizing Split Screen Functionality on Dell Laptops Via Windows
For those using a Dell laptop powered by Windows, understanding the shortcut keys to manage split screen view can significantly boost productivity. Here’s a quick guide to help you get started.
Split Screen Keyboard Shortcuts
The split screen feature in Windows, also known as Snap Assist, can be controlled using a series of keyboard shortcuts, eliminating the need for the mouse:
- Windows Key + Left Arrow Key: This combination can be used to shift the active application window to the left half of your screen.
- Windows Key + Right Arrow Key: Utilizing this shortcut moves the active application window to the right half of the screen.
Upon splitting the screen using the above shortcuts, you’ll notice that the other half displays a selection of windows that are currently open. Use the Arrow keys to select the applications to fill the other half of the screen, then hit Enter to confirm your choice.
These split screen keyboard shortcuts are beneficial when you’re looking to work efficiently by displaying several windows simultaneously – you can read statistical data on one half and write a report on the other, or follow a tutorial while applying the lessons on a different window.
By mastering these shortcuts, you’ll be able to manage split-screen views effortlessly on your Dell laptop, thereby enhancing your multi-tasking abilities.
First Step: Launching the Programs to be Displayed on Split Screen
The first step in setting up a split screen on your Dell laptop involves opening the programs or applications you would like to use simultaneously. This is an essential step because it can save you the trouble of flipping between different windows. Instead, you can work on two different tasks at the same time.
How to Launch the Applications
Follow the steps below to start the applications:
- Use the Start Menu in Windows: Click on the Start button (at the bottom left corner of the screen). Then navigate through your Program List and select the desired application to open it.
- By typing in the search bar: From the taskbar, type the name of the application you want to open in the search bar and then click on the application from the search results.
- You can also use the shortcuts on your desktop: Simply double-click on the icon of the application you want to run.
Remember, you can keep multiple applications open in the background. However, ensure that your PC has the required capacity to handle the tasks without slowing down or freezing.
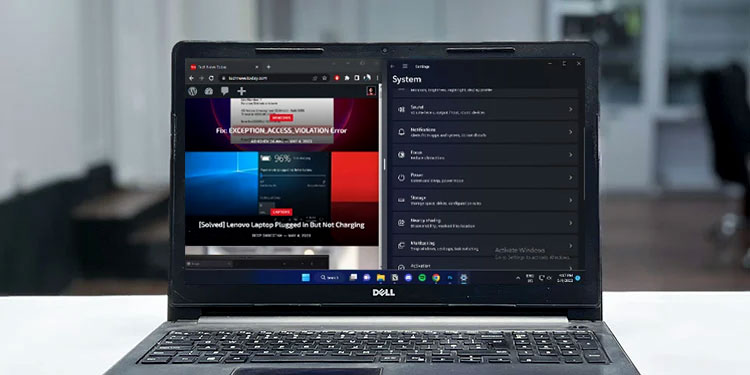
Utilizing the Snap Assist Feature on Windows 10: A Phase-by-Phase Outline
In the course of diverging your screen on a Dell laptop, the Snap Assist characteristic in Windows 10 can be instrumental. This tool allows you to organize your windows in an efficient manner so you can work on multiple applications simultaneously. Here’s a detailed guide on using Snap Assist.
How to Activate the Snap Assist Function
Before you can split your screen, the Snap Assist option must be enabled on your Dell laptop. To do this, go to your system settings. Find the ‘System’ section and select ‘Multitasking’. On the right pane, find the ‘Snap Assist’ option and make sure it is turned on. If it is not, switch it on to commence your screen-split journey.
Using Snap Assist to Split your Screen
With the Snap Assist’ now enabled, you can easily split your screen. Simply open an application and drag it to the left or right edge of the screen. A transparent overlay will appear, indicating that your selected window will occupy half of the screen. Release your mouse or trackpad to snap it into place. Following this, Snap Assist will display your other open windows in the empty half of your screen. With a simple click on one of these windows, it will adjust to fill up the remaining space, effectively creating a split screen.
- First and foremost, initiate the program that you wish to view on one side of the screen.
- Navigate your cursor to the program’s title bar, and press down on your mouse or trackpad.
- Afterward, drag the window to the left or right side of your screen. As a result, a transparent overlay will manifest indicating the occupied half of the screen.
- Release your mouse or trackpad to establish the window in its new spot.
- Snap Assist will then exhibit your remaining open windows on the desolate half of your screen. Select one of these windows to fit it into the leftover space.
The direct and intuitive nature of the Snap Assist’ feature allows for a more streamlined usage of your laptop, making multitasking a breeze.
Third Step: Dividing Your Screen Vertically on a Dell Laptop
After laying down the fundamentals of managing multiple tasks on your Dell laptop, let’s step up the effort by understanding how to divide your screen vertically. This is an essential feature often employed by professionals who engage in multiple tasks simultaneously, such as coding and data analysis, or who simply desire a more organized working window.
Using the Windows Snap Assist Feature
The simplest way to split your screen vertically is by using the Windows Snap Assist. Here is a step-by-step guide on how to do this:
- Locate the open window that you want to split. Click on the title bar and drag it to the left or right edge of the screen until an outline of the window appears.
- Release the mouse or take your finger off the screen to drop the window into place.
- Pick the other window you want to split and repeat the process, this time dragging it to the opposite side of the screen.
You should have two neatly arranged vertical windows on the screen of your Dell laptop. This feature works best in Windows’ newer versions like Windows 10 and Windows 8. If you’re still using Windows 7 or earlier versions, it’s time to consider an upgrade!
Using the Keyboard Shortcut
An alternative to the drag-and-drop method is using the Windows keyboard shortcut. Here’s how you can do this:
- Select the window you want to split by clicking on it.
- Press the Windows key + the right or left arrow on your keyboard.
- Select the other window and repeat the process, except this time use the opposite arrow key.
Now, your Dell laptop screen should be split vertically, assisting you in handling multiple tasks more efficiently.
Step Four: Splitting Your Dell Laptop Screen into Top and Bottom Zones
Once you’ve decided you’d like to split your screen horizontally on your Dell laptop, follow the steps outlined below. Remember, knowledge of keyboard shortcuts will save you time during this process.
Using Snap Feature for Horizontal Split
The built-in Windows Snap feature helps to effortlessly split the screen horizontally on any device, including Dell laptops. Here’s a step-by-step guide:
- Open the first window you’d like to view on your screen.
- Move your mouse cursor to the top of the window. Once the cursor changes into a hand, click and hold down the mouse button.
- With the mouse button still held down, drag the window towards the top edge of your screen. Upon reaching it, a subtle outline of the window will appear release your hold at this point. The window will now occupy the top half of your Dell laptop screen.
- Repeat these steps with the second window, dragging it to the bottom edge this time.
By following the above steps, you should now know how to efficiently divide your Dell laptop screen top and bottom.
Using Keyboard Shortcut for Horizontal Split
You can also use a keyboard shortcut to split your screen.
Steps to follow:
- Open the two windows you want to split across your screen.
- Select one of the windows.
- Press the Windows Key + Shift + Up Arrow keys together to move the window to occupy the top half of the screen.
- Click on the second window and press the Windows Key + Shift + Down Arrow keys together. This moves the second window to take up the bottom half.
That’s it! You have successfully split your Dell Laptop screen horizontally using the keyboard shortcuts. Now, you can work comfortably with two open windows simultaneously.
Tackling Usual Difficulties and Providing Solutions When Utilizing Multi-Window Feature on a Dell Notebook
Running several apps side-by-side on your Dell notebook can enhance your productivity. However, you may face some difficulties when utilizing the multi-window feature, or so-called screen splitting, on your device. Below you’ll find some of the most common issues that users often come across, alongside some simple solutions to tackle them.
Frequent Problems and Their Remedies
Issue 1: Unable to split the screen
Solution: Ensure you are running your notebook on the latest version of Windows, as lower versions may have compatibility issues with the multi-window feature. Go to ‘Settings’, click ‘Update & Security’, then ‘Windows Update’, and finally ‘Check for updates’.
Issue 2: The split screen function doesn’t respond
Solution: Try restarting your machine. If it still doesn’t work, check the settings of the specific app that you’re trying to run on a split screen. Some applications may have their own settings that block multi-window usage.
Issue 3: When using the split screen function, one window becomes unclickable
Solution: Make sure the application itself is responsive. If it’s not, try terminating it and launching it again. If you’re still experiencing issues with it, installing an update or reinstalling the app might be necessary.
Issue 4: The split screen is working, but the layout is not as expected
Solution: Adjust the splitting structure as per your preference. Drag the dividing line between the windows to resize them. You can also swap their positions by dragging the title bar of a window and dropping it on the other side.
Applying these solutions to your Dell laptop will most likely solve any issues you’re experiencing when trying to implement screen splitting. If none works, you may want to consider seeking professional assistance.
Additional Strategies: Maximizing Productivity with the Use of Split Screen Functionality
To take full advantage of the split screen feature on your Dell laptop for best productivity levels, there are several additional strategies you can apply. Understanding how to maneuver this feature with tips and tricks can help enhance your multitasking and productivity significantly.
Effective Arrangement Of Windows
One strategy that works wonders is an effective arrangement of windows on your screen. Instead of opening multiple tabs in a browser or numerous programs and getting lost among them, you can open two windows side by side, and smoothly switch between tasks or projects without losing sight of them.
- For instance, if you are doing research, you may have a web browser on the left side of your screen, and a Word document where you jot down key points on the right. This can decrease distractions as you dont need to keep minimizing and maximizing windows.
Use Multiple Virtual Desktops
Another way to maximize productivity using split screen on a Dell laptop is to use multiple virtual desktops. Most modern operating systems, such as Windows 10, allow you to create several virtual desktops so you can have different programs running on each one. This feature can be particularly useful when you are working on multiple projects at the same time.
- For example, you can have one desktop for work and one for personal use. You can have all your work-related programs (such as email, specific software, etc.) on one desktop and all your personal programs (such as social media, news, music, etc.) on a separate desktop. This can help maintain a clear line between work and recreational activities.
These are just a few ways to harness the potential of the split screen option for maximizing productivity. But remember, the key to it all is practice. The more experience you get arranging your screens and managing multiple windows or desktops, the more easily you can adapt to this way of working and boost your productivity levels.
Recap of How to Divide Your Laptop Screen into Several Parts on Dell
Executing the process of separating your display into multiple portions on a Dell laptop could seem overwhelming, but the step-by-step guide simplifies the entire procedure for you. This brief summary is designed to jog your memory about the fundamental steps that must be undertaken to achieve the split screen effect.
Screen Division Made Easy on Dell Laptops: A Rewind
Let’s start by reviewing how you can manage multiple windows efficiently using the inbuilt feature of your operating system. The Window’s Snap Assist feature is a game-changer in this context.
- Begin by having the windows you want to split open.
- Drag a window to the edge of your screen, literally snapping it into place.
- When the prompt appears, select the other window youd like to view simultaneously on the other side of the screen.
However, if you crave a more refined control over the screen layout, you might want to use Dell’s Easy Arrange feature available in Dell Display Manager software.
- Start by opening the Dell Display Manager and navigating to the EasyArrange feature.
- In the array of predefined templates, pick the one that matches your preferred screen layout.
- Finally, snap your open windows into the designated spaces in the chosen grid layout.
Note: You can always adapt this process to suit your needs, whether you’re using a single display or multiple ones.
In conclusion, mastering screen splitting techniques can go a long way towards enhancing your productivity. With this summary as a quick reference, you should find navigating the screen division setup much easier.
FAQ How to split screen on dell laptop:
What is the first step to splitting the screen on a Dell laptop?
The first step is to ensure all the applications or programs you want to view side by side are open.
What should I do after opening the applications I need?
Click and hold the title bar of the first application, then drag it to the left or right side of your screen until you see an outline of the expanded window.
How do I activate the split screen feature?
Simply release the mouse after dragging it to the side. The split screen feature will be activated and the application window will occupy half of your screen.
What should I do to have the other application split on the other side of the screen?
Select the other application and repeat the drag process, but this time to the opposite side of your screen. The window will automatically resize to fit the other half of your screen.
How can I adjust the size of the screens?
You can adjust the size of the split screens by clicking and dragging the dividing line between the two screens.
Can I split the screen with more than two applications?
Yes, you can split the screen with more than two applications. Simply repeat the procedure with your selected program or application.
Most Popular Articles
Best Triple Monitor Stand – Triple Monitor Desk Mount

Overview of Ryzen 7 5700G and Ryzen 5 5600G processors. Is it possible to mess up Zen 3?

Laptop with 4G modem on ARM – TCL Book 14 Go (B220G)
Ultimate Guide: Unlocking Your Dell Laptop Keyboard
Lenovo ThinkPad X1 Fold (20RL-000FRT) laptop review: the first convertible laptop with a flexible screen
G.Skill Unveils 32GB DDR5-6800 and 64GB DDR5-6400 Speed Trident Z5 RGB Memory Kits